
Sections
- Introduction
- Setting Up Microsoft Planner with Microsoft Teams
- When to Add a Planner to a Microsoft Teams Channel?
- Creating a New Microsoft Planner Task
- Handing Off a Microsoft Planner Task
- Conclusion
Introduction
Like most people working remotely, we have found it difficult not to be able to easily chat with a colleague at work as they, for example, walk by our desk.
Those little moments are often when people would fill someone in on little details that don’t require a full-on meeting like, “Hey, I just sent you that draft to review.”
Little reminders and updates are what many of us were used to throughout our day because it was an easy way to keep up communication such that projects move forward at a good pace.
It can feel odd to schedule a meeting just to update a colleague that you sent them a draft to review with remote work. There is always direct messaging for quick updates but what if you send a message with information that needs to be referred to later?
As the Communications Coordinator at Iteration Insights, I am often collaborating on multiple marketing projects with the Marketing Coordinator. With so many small projects needing to be handed off multiple times between us, we quickly got overwhelmed trying to keep track of everything.
We needed clearly defined ways to communicate about different tasks while also being able to refer back to that communication when working on the task.
This led us to create a defined Microsoft Planner process so we can easily hand off projects one or more times without necessarily needing to check in with each other in a meeting or with direct messaging each time.
In this blog, we outline our process so you can apply it to your own work in a small company or group.
Setting Up Microsoft Planner with Microsoft Teams
If you have Microsoft Teams downloaded, Microsoft Planner should already be included and ready to go. Microsoft Planner is included in Office 365 and can be used in Microsoft Teams or as a mobile app.
There are tabs at the top of each Teams channel where you can add a Planner for anyone in that channel to access.

There is also the app called Tasks by Planner and To-Do which you can pin to the sidebar in Teams. In this app, you can view all Planner tasks, personal To-Do tasks, and organize by tasks assigned to you.

When to Add a Planner to a Microsoft Teams Channel?
Within Microsoft Teams, you can set up and work in different channels. In our Marketing Team, we originally had all marketing tasks in a Planner in our Marketing General channel.
We quickly realized we had too many collaborative social media tasks to fit in just one category bucket under the Marketing General Planner, though.
We decided to add a Planner to our Social Media channel that sits in the Marketing Team. Now we know that if a task is specific to social media, we will go to that channel and access the category buckets within that Planner.

Figuring out where the bulk of your collaborative tasks are found is key to determining which Teams channels need a Planner added to them and what bucket categories are needed.
If tasks are mainly done by one person, that person can simply use Microsoft To-Do to keep track of their own tasks.
Microsoft Planner used in Microsoft Teams is most beneficial for collaborative tasks because those tasks are visible to anyone who is part of the Teams channel.
Creating a New Microsoft Planner Task
In this section, we outline how we use, or could use, each component when creating a new Microsoft Planner task.
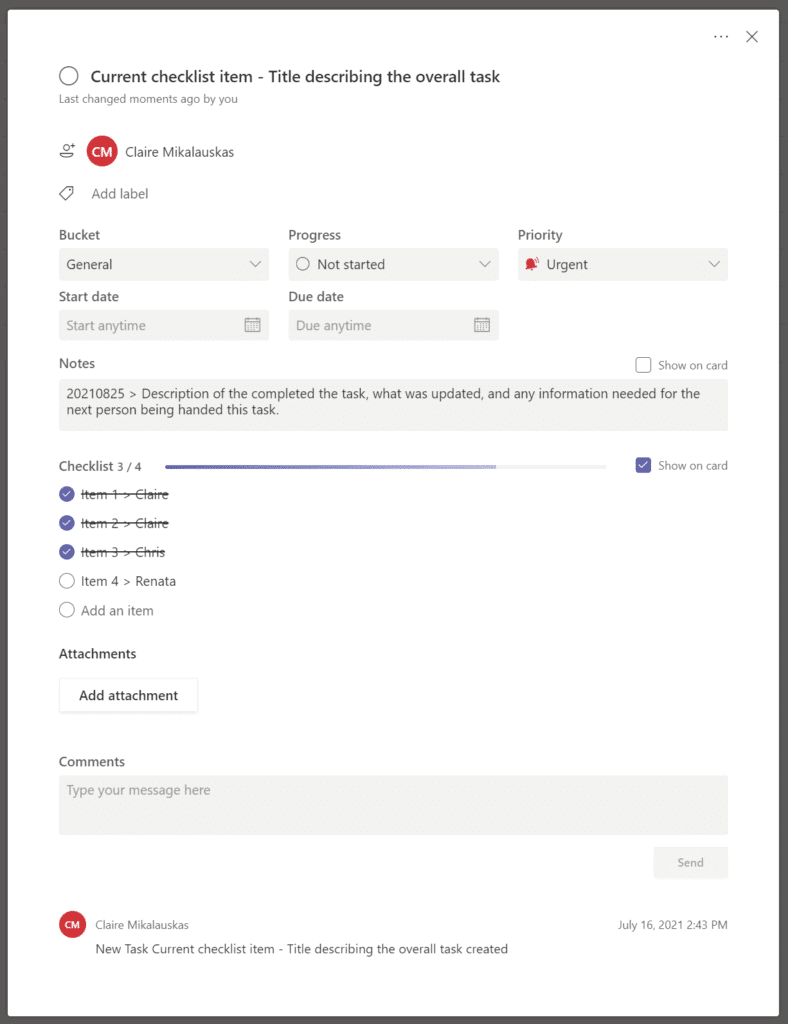
Task Title
We create a descriptive title that describes the overall task. Then, we add the current checklist item to the title so when we look at our task title or hand off the task to someone else, it is easy to see what needs to be completed next at a glance.

The current checklist item listed in the title should ideally be updated each time something is completed on the checklist. At the very least, it should be updated before handing off the task to another person so they can see their assigned item when the task notification comes through.
Assign To
We have found that while many people may work on a task, assigning the task to one person at a time is more efficient and successful in the completion.
The key to this is to have an in-depth checklist that is specifically ordered based on what steps someone needs to complete before the task is handed off.
Also, by only having one person assigned to a task at a time, you are guaranteed to send a notification to your collaborator when you complete your portion of the task and hand it off to them.
For example, if I were assigned to a task alongside my colleague Renata, she would not get a notification when I check off my items on the checklist.
By having me as the first person assigned to the task, I can complete my items then hand off the task to her when I have completed my steps in the checklist order.
Read more about our hand-off process in the section Handing Off a Microsoft Planner Task.
Label
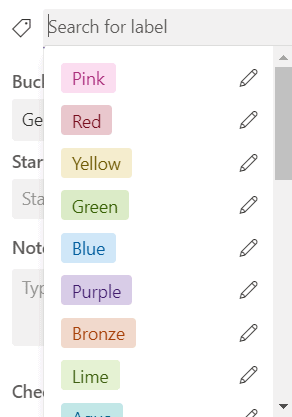
We have not used the labels yet, but we could see these being added organizational layers to the bucket categories.
The labels are colour-coded, and you can create custom names for them. This could be useful for categorizing different projects/clients that fall into the same bucket categories.
Bucket

When creating bucket categories, you want to find the right balance between specific and general titles. If you get too specific, you might only ever put one task in that bucket. But if you’re too general, all your tasks might fall in that bucket.
We have continued to adjust our bucket titles as we figure out our workflow. We also try to have as few bucket categories as possible so we can see all the tasks on one page more easily.
The more bucket categories you have, the more you must scroll from left to right to see all your tasks when looking at your planner.
Having logical titles for the bucket categories also keeps things straightforward when looking for tasks that aren’t directly assigned to you.
For example, you may want to check the progress on certain blog posts being written so you look at the Blogging category bucket to find all those tasks, assigned to you or not.
We have also had ideas for tasks that we may want to do in the future but are not a current priority. We often place those tasks in their corresponding bucket but don’t assign anyone to it when it’s created.
This can lead to a lot of lost and forgotten tasks if your categories don’t make sense and/or someone is not checking on the progress of all tasks in a planner at regular intervals.
Progress
Usually, we don’t manually update the progress of a task because the progress with our checklist items is more meaningful to us. Having something listed as “not started” or “in progress” does not give much detail on the actual progress of a task.
However, seeing that 3/4 checklist items have been completed tells us that the task is in progress plus gives an understanding of how much progress has been made.

Priority
We initially avoided listing any priority other than the default “medium” priority and quickly ran into an issue.
Although some tasks had a far-off deadline, they were actually more of a priority because the different checklist items would take a decent amount of time to complete, or the task had to be handed off to multiple people which would take more time as well.
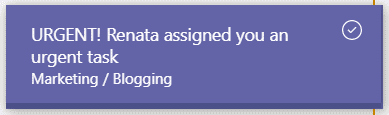
We realized that we were afraid to mark something as “urgent” or “important” because those are really intimidating words. Receiving a notification that someone has assigned you an urgent task is quite daunting.
Since we can’t change the words used for these priority settings, we simply assigned specific meaning to each of the priority settings so we would actually understand what the priorities meant to us and our timeline:
Urgent
Please complete this task within the next business day.
Important
Please complete this task within the next few business days.
Medium
Please complete this task when you have the time.
Low
This task is not a priority right now.
These priority labels should apply to the checklist item currently being worked on, so the person assigned to the task understands the timeline they are working with for their portion of the task.
Also, a task may become more urgent as the due date approaches so going over your planned and assigned tasks at regular intervals is key for efficiency.
Of course, something may be needed by end of the day or as soon as possible, and that would be when we turn to the use of direct messaging to communicate that urgency.
However, we have found it to be rare that something needs to be completed within less than a business day.
Start Date
We have yet to manually enter a start date for a task. Having one start date for a task with multiple checklist components doesn’t really provide much information for us.
We rely on seeing that the checklist is being completed to check for progress, and we list dates of completion for individual checklist items in the notes section.
Due Date
We use this as the final due date of the entire task. We then use the priorities to adjust the timeline of specific checklist items.
This is most useful when looking at our own “assigned to me” tasks in the Tasks by Planner and To-Do app because you can order tasks based on priority or due date.
Notes
The notes section is used as our main communication point since it is immediately visible when opening a task. We use the notes section to add details everyone needs to know to complete the task.
We also add dates when an item on the checklist has been completed, including a description of what was completed and what was updated in the task.

Checklist
The checklist is our main point of organization for collaborating on a task. It allows us to break down a task into actionable ordered steps and assign those steps to the appropriate people. Once your portion of the task is complete, you know exactly who to hand it off to next.
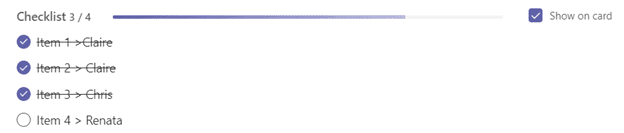
No matter the type of task, we find the more steps we can break it down into, the better. Even if that means multiple steps in a row belong to the same person.
Taking the time to set up a task properly allows for less confusion while working on the tasks and also provides a detailed record of the task once completed.
Comments
We avoid using the comments section as the notifications have been inconsistent. It seems that only the creator of a task will get notified when a comment has been added and this was confusing when communicating between team members about a task.
Also, since the comments are at the bottom of a task, people tend to forget to look at them.
We find the combination of an updated notes section and a notification when a task is handed off to the next person allows for better communication with our tasks.
Attachments
Any documents, links, or media being used in a task should be attached to the task.
For bigger tasks, we often include a OneNote link as well. For example, if part of the task is writing a large amount of copy, a OneNote is a great place to use for writing a draft.
We have a OneNote for each channel in Teams so everything is organized, linked to the task, and can be easily referred back to as needed.
Handing Off a Microsoft Planner Task
With all the components of a task set up accordingly, our hand-off process has been the best way for us to collaborate effectively without the need for constant small check-ins.
We have found it easiest when a task only has one person assigned to it at a time. This way you know that if a task is assigned to you, it is because it is your turn to work on something in the task.
Then, once done your current checklist items, you are either done the task completely or handing it off to someone else. Either way, once your part is done, the task leaves your “Assigned to me” list.
Before we hand off a task, we ensure the task is updated. When the person gets the notification of a task being assigned to them, they can look at it right away and have all the information there that they need to work on their portion of the task.
The sections of a task that need to be updated before handing off a task are as follows:
- Check off your completed parts of the checklist.
- Update the title to match the current checklist item (the item of the person being handed the task).
- Update the notes with the date and description of the task(s) you completed plus any relevant information the next person may need.
- Add attachments of anything you worked on for the task that the next person may need access to when completing their checklist item(s).
- Update the priority based on the current checklist items deadline.
Once everything in the task has been updated, you can remove yourself from the “Assign to” part of the task and hand it off to the next person. Adding a person to the “Assign to” section will trigger a notification for them in Microsoft Teams.
Conclusion
Remote collaboration can be difficult for so many people. It is harder to keep track of the progress being made because you can’t easily check in with people in passing. In general, remote work can be isolating.
We have found having a defined process allows us to get further with collaborative tasks, even when we aren’t able to check in regularly. We know the progress that is being made simply through the updated notes, checklist, and notifications.
This process also allows us to actually use our direct messaging and meetings more effectively as it is less about the logistics of where we are in a task, and more about catching up with each other, collaborating, and getting feedback.
What process have you created for remote collaboration? We always want to continue to learn and improve so please let us know in the comments below!
