
Power BI has a feature called Bookmarks, which enables users to save a particular view of a report page. This ability is extremely useful in enhancing the user experience of navigating a report or opening opportunities to add more depth to a report.
Some of the ways one can utilize the Power BI bookmarks feature are:
- Navigation menus
- Filter resets
- Swapping visuals and context
- Page overlays
Even though there are a plethora of ways in which Power BI bookmarks can be used, the basic principles remain the same. This guide will cover these basic concepts of bookmarks and the components relevant to building them.
Sections
- Introduction
- Creating a Bookmark
- Modifying a Bookmark
- The Selection Pane
- Navigation of Bookmarks
- Limitations
- Conclusion
Creating a Bookmark
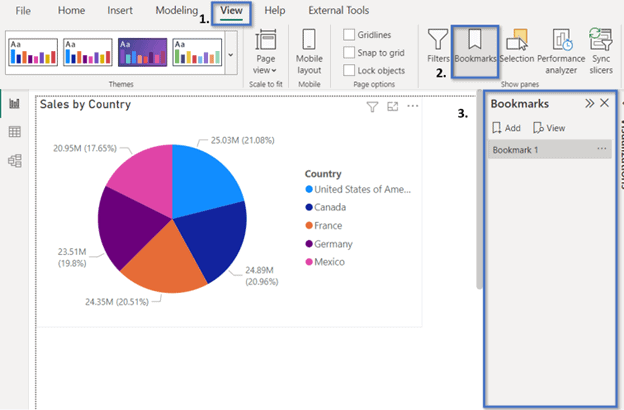
Setting up a Power BI bookmark in Power BI is extremely simple. Like the other panes in Power BI, the Bookmark pane can be found under the view category within the top ribbon (1). From here, selecting the bookmarks option (2) will bring up the pane to the right of the Report page (3). As described earlier, a bookmark will save the current state of the report page. This means that any individual visuals with a filter context applied will be saved in that state.
It is crucial to have the report framed exactly how the user wants it to be displayed. Multiple bookmarks can be added from any report page, and they will be displayed in the order in which they were added, even if they are not currently shown.
Modifying a Bookmark
Once a bookmark is added, a few options exist for its behaviour to be modified. By right-clicking the bookmark, we are given a context menu where these options can be found. The first four options are the most basic and frequently used.
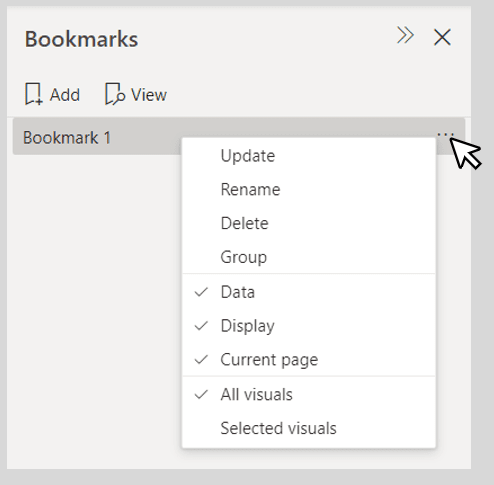
Update – Overwrites the saved state of the Power BI bookmark created with the state of the currently selected page. This can be important when visuals are changed or when additions need to be made within the bookmark. This is the most common modification.
Rename – Allows the bookmark to be renamed. Organization is very important when dealing with many bookmarks, and naming conventions can help to prevent some of those headaches down the line.
Delete – Deletes the bookmark. This field shouldn’t need to be used very often with the ability to update bookmarks. This option is not permanent when used and can be undone if a mistake is made in deleting.
Group – Allows bookmarks to be compiled together for an extra level of organization. Works like other grouping features within Power BI bookmarks can be dragged in and out of groups. A simple way to group a collection of bookmarks is by the pages that they are linked to.
The middle section of options is less commonly used but changes the actual behavior of the bookmarks. They are applied by default when a Power BI Bookmark is created.
Data – Applies the data properties like filters and slicers to the selected bookmark. This means if there is a slicer with a selected date, it will apply that selection every time the bookmark is opened.
Display – Determines whether the bookmark will carry over visual properties. This means if a visual is spotlighted within the bookmark when we create it, it will be active every time we open it.
Current Page – By default, the current page is selected, meaning that activating the bookmark will take the user to the page on which the bookmark was set. Without this, there is no page navigation on the bookmark, but it will still make the changes to its page.
The last section of this menu is an option of either All Visuals or Selected Visuals that allows only one selection.
All Visuals/Selected Visuals – The difference between these is whether the bookmark considers only the visuals that have been selected when it was created or all visuals on the page. This will change whether the visuals within the bookmark will need to be adjusted on a bookmark or page basis.
The Selection Pane
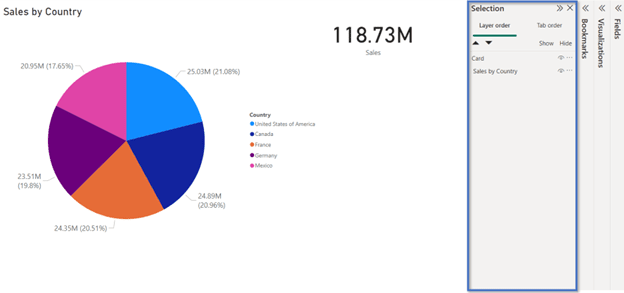
Power BI Bookmarks can be used and created solely through the bookmark pane, but the selection pane provides a great accompaniment for manipulating the page and its contents.
Hide/Show Visuals
The selection pane provides us with a list of the visuals on the page ordered by their layer on the page. From this list of visuals, we can choose to hide or unhide them. Hiding will keep all the characteristics and positions and just make it unable to be selected or seen on the page. This is important when dealing with bookmarks as, in many cases, when switching between the bookmarks, some visuals will want to be shown in place of others.
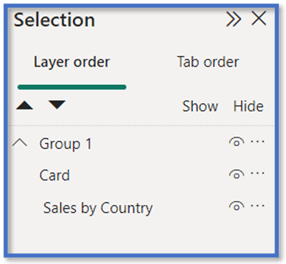
Selection Groups
Navigation of Bookmarks
Power BI Bookmarks Pane
The simplest way to interact with bookmarks is through the bookmarks pane. By clicking a bookmark in this section, it will activate said bookmark. In many cases, this may be the primary way they are triggered. For example, bookmarks can be saved for different date tracking when setting up a sales-type report. One bookmark could be used for YTD, while another may cover the entirety of sales. When in the report, the developer can easily have these personal bookmarks to follow and track. Overall, this method is less for consumer reports, although they may be used in them, and more for personal or internal reporting.
Buttons
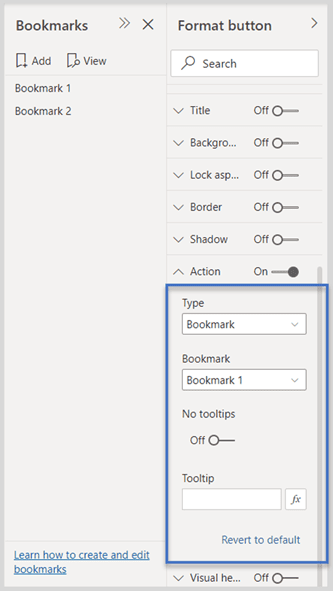
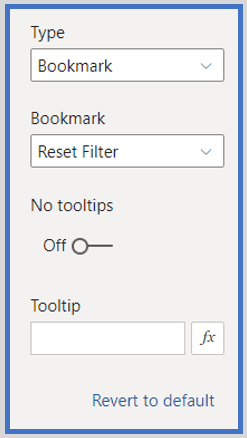
When building reports for users and read-only reports, Power BI bookmark buttons are necessary for bookmark interaction. Connecting the button to the bookmark is the same as with any other action: it can be found in formatting, and after the bookmark type is selected, the different bookmarks will show. Once it is connected, there are few other options for the interaction between either. It is straightforward in this respect. Clicking the button will activate the bookmark. The same is the case with bookmarks. Buttons all come down to how they are implemented within the report.
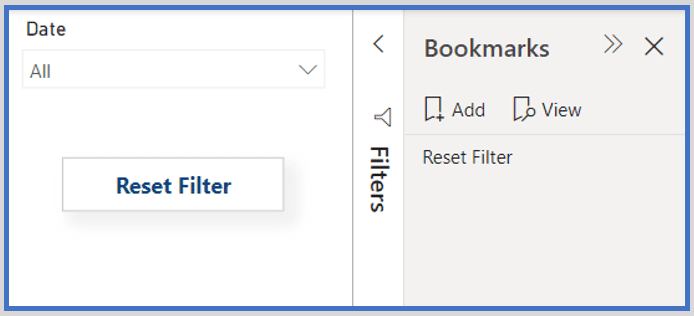
A filter reset is a simple example of a button and bookmark combination that can be used in most reports. It can be used on pages with slicers so that users can reset the slicer options back to specified settings.
This can be especially useful when there are multiple slicers that a user may be changing and wanting to switch between. All that needs to be done is to have a bookmark with the current page with no slicers affecting the visuals. Connecting this button to a bookmark will trigger this bookmark reverting any changes to the visuals back to how they were when the bookmark was set.
Limitations
There are several limitations when it comes to Power BI bookmarks that can cause some hesitation when using them. The most prominent one is managing them. Managing bookmarks can quickly become unwieldy.
When extra bookmarks are added, each one requires considerations that need to be made, such as the context of it and surrounding visuals. When loads of bookmarks are on the same page, they can also end up having unintended interactions.
Along with this, adding new visuals and making changes to the current page will also mean that previously created bookmarks will need to be modified and updated. Unfortunately, there are not many workarounds for this issue other than ensuring they are organized as best as possible.
Another limitation of Power BI bookmarks is their inability to change the characteristics of objects. This means that text, visuals, and buttons cannot be changed based on a bookmark.
The size of text cannot be adjusted between bookmarks. They will stay with the properties they currently have. This is more of an annoyance than anything since there are several workarounds; however, they require more to be done.
The main workaround for this is to have additional objects within the separate bookmarks. For example, if there’s a button that would need separate actions based on the bookmark’s context, like to open or close a page.
Instead, an additional button can be added over the previous one to give the appearance to the user that the same button is being used. This example can apply to any of these given changes that want to be made to the properties of an object.
Conclusion
Power BI Bookmarks is a powerful feature that can take a report to the next level, improving the user experience and general feel of the Power BI report design. Hopefully, this guide can help to give a solid foundation for meaningfully implementing bookmarks within an entire report, as all examples of bookmarks can be created with this foundational knowledge.
Browse our blog articles to keep tabs on the latest news, Power BI updates, and best practices in the industry!
