
Sections
- What are Sensitivity Labels?
- What Power BI Artifacts Can You Use With Sensitivity Labels
- Features of Sensitivity Labels
- Limitations of Sensitivity Labels
- How to Create Sensitivity Labels
- How to Enable Sensitivity Labels in Power BI
- Licensing and Requirements for Sensitivity Labels
- How to Apply Sensitivity Labels
- Conclusion
- Resources
What are Sensitivity Labels?
A Sensitivity label is an information icon that users can apply, either in the Power BI Desktop or the Power BI Service. They are essentially a digital stamp that can be applied to a resource to classify and restrict critical content when shared outside of Power BI.
For example: you have a report in the Power BI service that contains confidential data. You decide to create a sensitivity label to apply to this report. You name this label Confidential and configure the settings to restrict unauthorized users from opening the report if it leaves the Power BI service. If someone decided to e-mail this data to an unauthorized user (the confidentiality label has not been published to their Power BI account), a prompt will pop up indicating that they are not allowed to open the file.
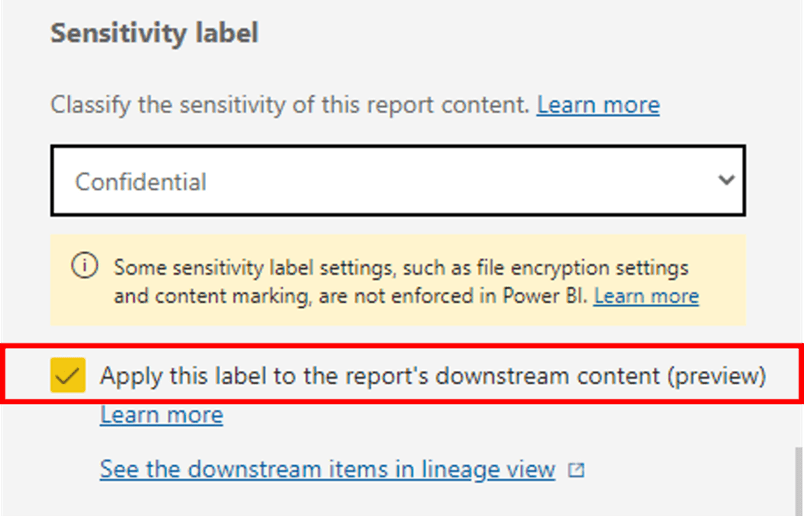
When you apply a sensitivity label to a Power BI artifact, you will have the option to select whether you want the label to have Downstream Inheritance. Downstream inheritance means the sensitivity labels will be inherited in any new content you create from that existing labeled artifact.
For example: if you create a report using a dataset with a Highly Confidential sensitivity label, your report will automatically have that same label.
Microsoft provides data protection in Power BI in the form of Sensitivity labels. Additionally, they can provide data protection for other Microsoft content such as Microsoft Word documents and Excel Workbooks. This blog only focuses on Sensitivity labels in Power BI. To learn more about general sensitivity labels in Microsoft 365.
Use Sensitivity Labels to Classify Content
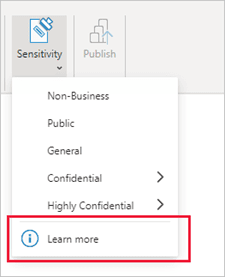
When a sensitivity label is applied to the artifact, it notifies the user that it requires special treatment. In addition, when creating the Sensitivity label, you can provide users with a Custom Learn more link. This gives the user more information on what the sensitivity label means or how the content should be treated based on the given label. The Learn more link points to a custom web page that contains information on the sensitivity label and how the content should be treated.
For example: you download a .pbix file and notice that it has a Highly Confidential Sensitivity. You click the Learn more link to find out more information about this label. This link brings you to a company webpage that informs you reports with a Highly Confidential label must not be shared between employees and other rules.
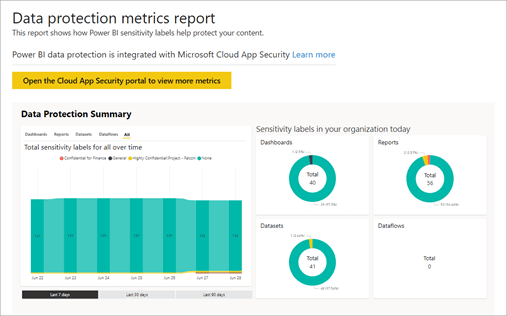
Classifying content with sensitivity labels is also used for Protection Metric reports. The Data Protection Metrics Report is a report automatically made that visualizes sensitivity label usage in your Power BI tenant. This report is available in the Power BI admin portal giving administrators (users with an assigned Power BI administrator role) full visibility of all the sensitive data held within their Power BI tenant. Using the Protection Metrics report and classifying content with sensitivity labels gives you a better understanding of sensitive data consumption within your organization – more information on Protection Metric Reports click here.
Use Sensitivity Labels to Restrict Content
Using Sensitivity labels reduces the risk of data theft within your company and prevents outside users from accidentally seeing sensitive information. When creating a Sensitivity label, you have the option to choose encryption settings for that label. These encryption settings can restrict unauthorized users from action on your sensitive content.
For example: You choose to e-mail a file with an Internal Information Sensitivity label to a colleague for feedback. The Internal Information Sensitivity label restricts unauthorized access. If you colleague attempts to open to file, and an error will occur notifying her that she does not have the appropriate permissions to view the file.
This Encryption solution uses the Azure Rights Management Service. For more information on how encryption works in regards to sensitivity labels, click here.
Important note:
As a file leaves the Power BI service, the applied sensitivity label protects the file according to the chosen encryption settings for that label. However, using sensitivity labels in the Power BI Service does not affect access to content. Sensitivity Labels are still visible, but encryption settings only apply to content that leaves the Power BI service. In addition, file encryption only supports the following Export paths:
- Export to Excel, PDF Files, and PowerPoint
- Analyze in Excel
- PivotTable in Excel
- Download to .pbix
- Sensitivity labels DO NOT support Export to .csv files.
Managing access to content in the Power BI Service can only be done by Power BI permissions. For more information on Power BI permission and Roles, check out this link.
What Power BI Artifacts Can You Use With Sensitivity Labels?
In the Power BI Service, Sensitivity labels are available for:
- Datasets
- Reports
- Dashboards
- Dataflows
- Paginated Reports (when published to the Service)
In the Power BI Desktop, sensitivity labels are available for:
- .pbix file
Features of Sensitivity Labels
- Sensitivity labels are available to apply within the Power BI Desktop. This method of application allows for protection on your created content from the moment you start developing it. The label is retained within the file even as it moves back and forth from Power BI Service and the Desktop.
- Sensitivity labels feature inheritance from supported sensitivity-labeled data sources. Currently, Azure Synapse Analytics and Azure SQL Database permit sensitivity label inheritance upon connectivity to Power BI.
- Organizations can create default or mandatory policies for sensitivity labels to ensure more comprehensive protection.
- For large volumes of data, there are Power BI Admin REST APIs to set and remove labels programmatically for all your Power BI content. For more information on Sensitivity labels and REST admin API’s click here.
- Auditing is available to investigate when labels are applied, changed, or removed. Auditing activity gets recorded in the audit log for Power BI administrators.
- Sensitivity labels and their encryption settings will be inherited when exporting a file from Power BI to Excel Workbooks, PDF Files (Service only), or PowerPoint files.
- Sensitivity labels are applied to the excel file when opening a protected dataset using Analyze in Excel.
- Sensitivity labels are visible in the embedded view of Power BI embedded dashboards and reports.
- Sensitivity labels get copied to new workspaces in deployment pipelines.
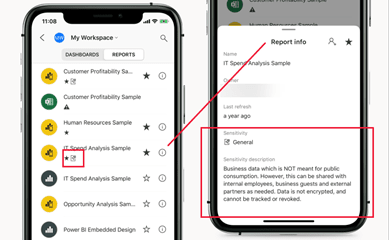
- Sensitivity labels are visible in Power BI IOS and android mobile apps
- Power BI allows only authorized users to change or remove labels that have file encryption settings.
Limitations of Sensitivity Labels
- Sensitivity labels do not support template apps. Template apps are pre-built Power BI apps that provide immediate insights through prepackaged dashboards and reports that users can connect to data sources.
- If a dataset has a deleted label (a label deleted from the admin center), there might be issues opening the file.
- Sensitivity labels in Power BI do not support the Do Not Forward, User-defined, and HYOk sensitivity labels.
- Users cannot get data from encrypted Excel files. In addition, users cannot refresh encrypted data from Excel files.
- Sensitivity labels in Power BI do not support B2B and multi-tenant scenarios.
- Power BI Desktop for Power BI Report Server does not support sensitivity labels.
- Users cannot apply sensitivity labels on paginated reports. Users must publish the paginated report to the Power BI Service, and then apply the label from within the Service.
- To Publish or Get data from a protected file, users of the file must be in the label policy of the sensitivity label.
- If you have applied an unpublished label to a file, you will not have the ability to save your file.
- .pbix files that are larger than 2GB, cannot be saved with a sensitivity label. Try publishing the file without the label to the Power BI Service and then apply the label in the Service.
- Temp files that are saved automatically in Power BI will not be encrypted.
- In the Power BI Desktop, sensitivity labels do not support Export to PDF. If you try to do this, the PDF file will not have any protection or a label.
How to Create Sensitivity Labels
Users can create Sensitivity labels in the Microsoft 365 compliance center. Access to this feature in the Microsoft 365 compliance center is available for admins of the Microsoft 365 of your organization.
Within the Microsoft 365 compliance center, go to
- Solutions
- Information Protection
- Labels
- Create a label
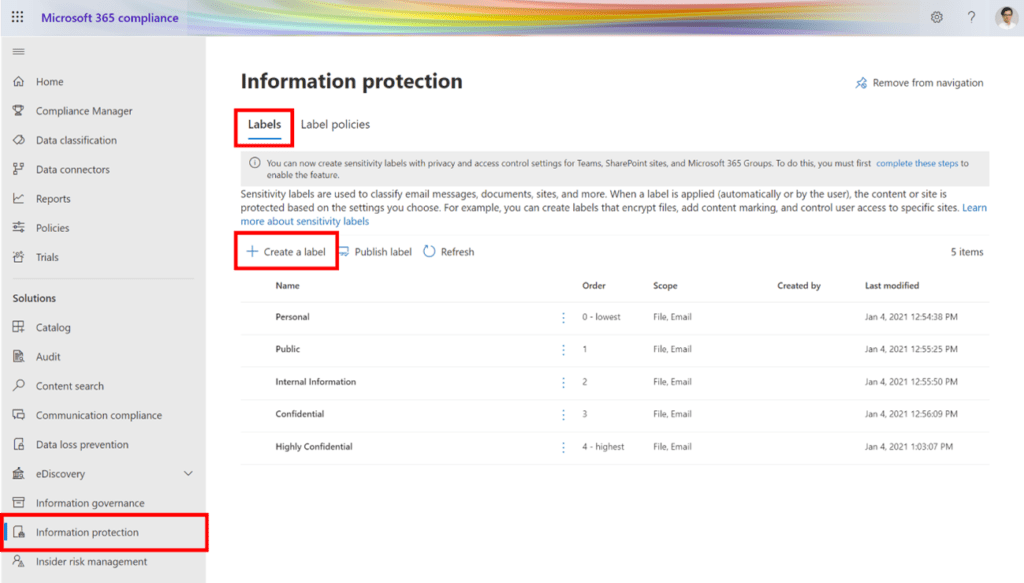
If you do not have this option, you may be in the Office 365 Security & Compliance Center, where sensitivity labels are under Classification.
When you create a sensitivity label, the prompt will ask you to:
- Name your label.
- Provide a description and display name for users.
- Define the scope for the label.
- This section is where you choose where you want the label to be visible to users and configure the settings for that label. You will have three options to select: File and Emails, Groups and Sites, and Azure Purview assets. Defining the scope can be important because some organizations want separate labels for documents and containers such as Teams, Microsoft 365 groups, and SharePoint sites.
- Choose the protection settings for both Files and Emails and Groups and Sites. You have two options available to select: Encrypt files and emails and Mark the content of files. After selecting these options, the prompt will ask you to configure the encryption, customize content marking, and enable auto labeling settings.
- Select to Publish the label or automatically apply the label to sensitive content.
Once you choose to publish a label, the prompt will ask you to create the label policy. To use the label, you must publish labels to a label policy. A label policy consists of the users and groups authorized to view the content with the label.
- Choose the label or labels that need a new policy.
- Choose which users and groups you want the label published to (only these users will have the authorization to use the label).
- Choose policy settings such as having a default or mandatory label. In the policy settings, you can select the option to provide users with a link to a custom help page.
- Provide a name and a description of your policy
- Review your settings
How to Enable Sensitivity Labels in Power BI
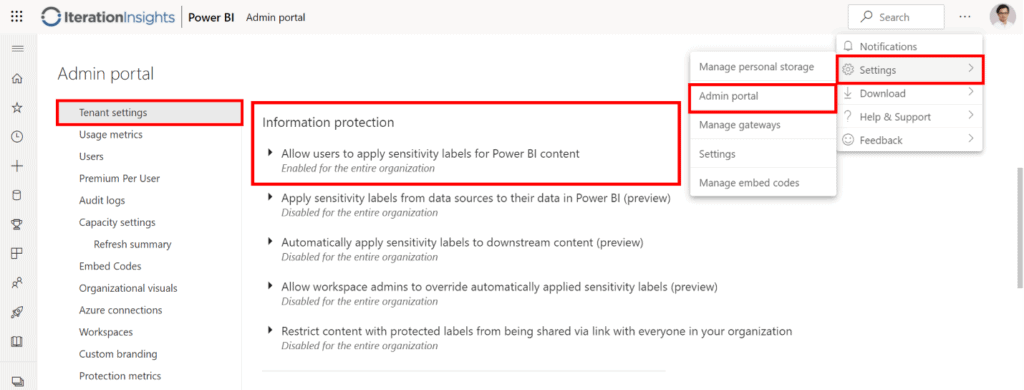
To use the sensitivity labels that you have created in Power BI, you must enable them in the tenant settings of the Power BI Service Admin portal. You will only have access to the admin portal if you are assigned an admin role in the Power BI service.
Within the Power BI admin portal, go to:
- Tenant settings
- Information Protection
- Allow users to apply sensitivity labels for Power BI Content
- Slide enabled so that it is ON for your organization
- In the Apply to section, you can select who within your organization will be allowed to use sensitivity labels in Power BI. The options provided are: The entire organization, specific security groups, or create exceptions for specific security groups.
Licensing and Requirements for Sensitivity Labels
To enable Sensitivity labels on your tenant, you must have all of the following:
- An Azure Information Protection (AIP) P1 or Premium P2 License. (This license may already be included in your Microsoft 365 service subscription depending on the subscription your organization has)
- Power BI Pro or Premium Per User License
- Power BI Desktop December 2020 release or later
To view a document with a sensitivity label, the viewer must:
- Be published to the sensitivity label policy (see How to create Sensitivity labels for more information)
- Have a Power BI Pro or Premium Per User license or be in a dedicated Premium capacity
How to Apply Sensitivity Labels
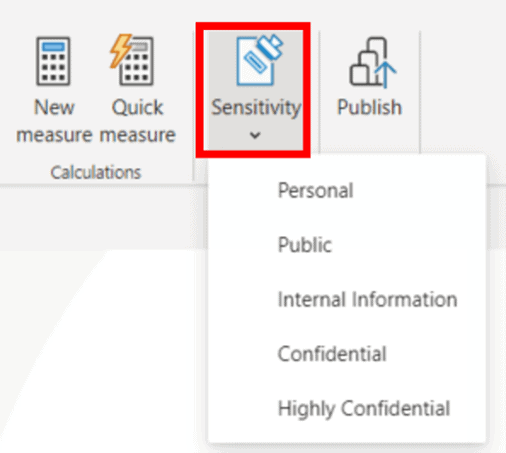
In the Power BI Desktop
Under the home tab of your Power BI desktop, there is a section under Sensitivity. Click Sensitivity and select the label you want to apply to the .pbix file.
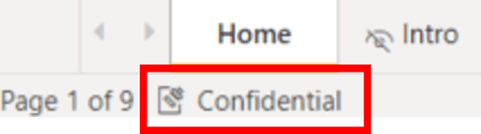
Once assigned a label, the label will appear at the bottom left of the report in the status bar.
In the Power BI Service
1. Click the three-dot more options button for the Power BI artifact that needs labeling and go to settings.
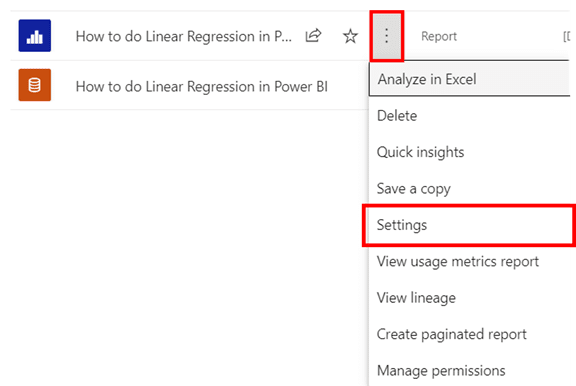
2. Scroll down in settings until you find the Sensitivity label section. Select the label you want to be applied and choose whether you want the label to downstream to new content.
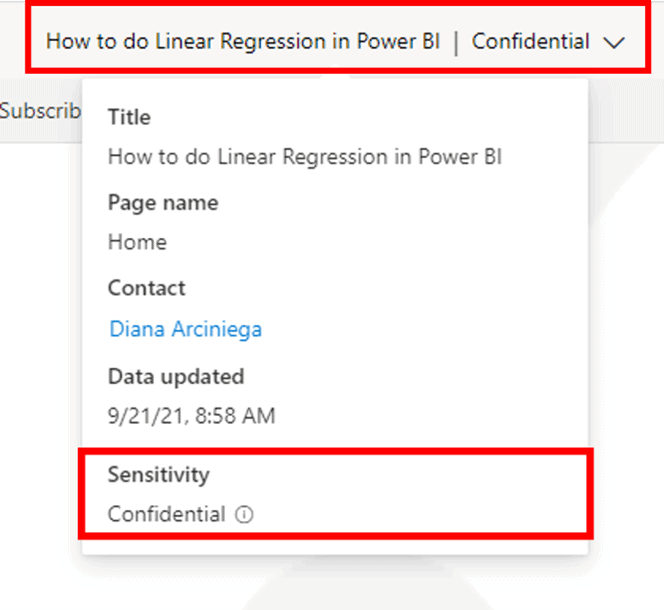
Viewing the report in the Power BI Service, the sensitivity label is displayed next to the title of the Power BI report.
Conclusion
Sensitivity labels provide you with the confidence that sensitive content in your organization is protected. By using them to classify and restrict content, you protect sensitive data from unauthorized viewers.
Take advantage of using Sensitivity labels in your organization and start feeling more secure about your organizations data.
Resources
Want to dive deeper into Sensitivity labels? Check out these links I found helpful.
Learn about Sensitivity Labels
Sensitivity labels in Power BI
Enable Sensitivity labels in Power BI
Restrict access to content Sensitivity labels
How to apply sensitivity labels in Power BI
Set or remove sensitivity labels using Power BI REST admin APIs
Protect your data – with Guy in a Cube
How to create and manage Sensitivity labels in Power BI – with BI Consulting Pro
