Contents
- Prerequisites for Azure and DevOps CI/CD
- Step 1: Setting up the Azure environment
- Step 2: Setting up the Azure DevOps Environment
- Step 3: Creating an Azure DevOps Pipeline
- Step 4: Creating an Azure DevOps Release Pipeline
Continuous Integration and Deployment for Azure Data Factory allows you to keep the state of your Data Factories consistent. This minimizes the dependency on manual changes in numerous environments will enable a stable architecture.
A few months ago, I found myself troubleshooting an issue in our PROD Data Factory that was not present in our DEV Data Factory.
I had made the changes from DEV in PROD manually and was 100% sure that they were identical. Nevertheless, with each day the pipeline in PROD would take a few minutes longer to run. Within a week that additional time had accumulated to an extra hour.
After taking some time to troubleshoot, I had realized that the PROD pipeline was missing a pre-copy script in a copy activity. Without our knowledge, a table was growing daily which had a waterfall effect when loading other tables causing an increase in the pipeline’s runtime.
If I had some sort of Continuous Integration and Deployment present, I would not have experienced such an issue.
I will be walking you through how to set up an Azure DevOps repository for your Data Factory and utilize Azure DevOps pipelines to push changes in DEV to your other environments. We will create all the necessary resources required for three environments: DEV, UAT, and PROD. These environments will be accompanied by a basic DevOps pipeline.
Prerequisites for Azure and DevOps CI/CD
There are several things to consider before starting. You will need access to an Azure Subscription with the ability to create resource groups as well as resources with the “Owner” role assignment. Without the “Owner” privileges, you will not be able to create a service principal that provides DevOps access to your Data Factories within your Resource groups.
It is also beneficial to have some exposure to creating basic Azure Data Factory pipelines.
Step 1: Setting up the Azure environment
We will start by creating three resource groups as well as three data factories. Each pair will resemble one of the three environments. This can be done through the Azure Portal. Keep in mind, Resource Group names have to be unique in your subscription, whereas Data Factories must be unique across Azure.
For this walkthrough, we will follow the following naming scheme for our resources:
<Your Initials>-<Project>-<Environment>-<Resource>
Microsoft provides some great documentation on naming conventions. I highly recommend having a look at these.
*Important* If you are already familiar with the Azure portal, you can skip Step 1 entirely by running a PowerShell script in this GitHub Repository. Make sure to make the appropriate changes to the variables within the script.
1.1 Creating Resource Groups
With the naming scheme in mind, we will create three Resource Groups with the following names (do not forget to use your initials):
“<Initials>-warehouse-dev-rg”
“<Initials>-warehouse-uat-rg”
“<Initials>-warehouse-prod-rg”
1.1.1 Creating the DEV Resource Group
Once logged into Azure, on top of the home page click on “Create a resource”

Using the search bar, search for “Resource Group” and select “Resource Group” from the search results.
Once in the “Resource Group” resource information page, click “Create”.
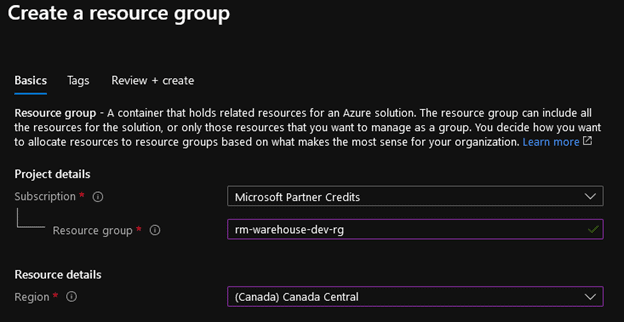
On the “Create a resource group” page there will be three fields that need to be filled out:
- Subscription – Choose your subscription from the list
- Resource Group – “<initials>-warehouse-dev-rg”
- Region – Select the Region that is most appropriate to your current location.
The result should look something like this:
Click on “Review + Create”.
You should see a green bar on the top of the page that says, “Validation passed”.
Click “Create” at the bottom of the page.
1.1.2 Creating the UAT and PROD Resource Groups
Now that we have created our first resource group, follow the same steps to create the UAT and PROD Resource Groups:
“<Initials>-warehouse-uat-rg”
“<Initials>-warehouse-prod-rg”
Once you have created all three Resource Groups, you should see them in your azure portal:

1.2 Creating Azure Data Factories
Now we will start creating the necessary Data Factories in each respective Resource Group that we created.
With the naming scheme in mind, we will create three Data Factories with the following names (do not forget to use your initials):
“<Initials>-warehouse-dev-df”
“<Initials>-warehouse-uat-df”
“<Initials>-warehouse-prod-df”
*Important* Since Azure Data Factory names must be unique across all of Azure, you might need to add a random number(s) to the end of your initials for it to be unique. This will not cause any issues going forward.
1.2.1 Creating the DEV Data Factory
On top of the Azure home page click on “Create a resource”

Using the search bar, search for “Data Factory” and select “Data Factory” from the search results.
Once in the “Data Factory” resource information page, click “Create”.
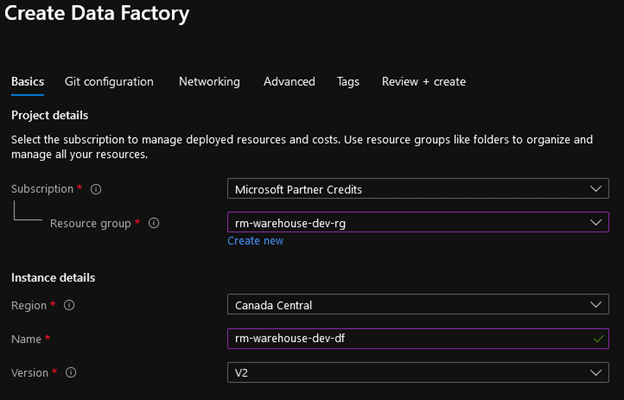
On the “Create Data Factory” page there will be five fields that need to be filled out:
- Subscription – Choose your subscription from the list
- Resource Group – Select “<Initials>-warehouse-dev-rg” from the drop-down menu.
- Region – Select the Region that is most appropriate to your current location.
- Name -<Initials>-warehouse-dev-df
- Version -V2
The result should look something like this:
At the bottom of the page click on “Next: Git configuration >”
With regards to the Git configuration, it is something we will be setting up later. Make sure the “Configure Git Later” checkbox is checked off.
Click on “Review + Create”.
You should see a green bar on the top of the page that says, “Validation passed”.
Click “Create” at the bottom of the page.
1.2.2 Creating UAT and PROD Data Factories
Now that we have created our first Data Factory, follow the same steps to create the UAT and PROD Data Factories in their corresponding Resource Group:
“<Initials>-warehouse-uat-df”
“<Initials>-warehouse-prod-df”
Once completed, you will be able to see one Data Factory in each Resource Group. The environment of the Data Factory should be identical to that of the Resource Group.
Step 2: Setting up the DevOps Environment
2.1 Creating a DevOps organization
In this section, we will be creating an Organization and Repo that will contain our Azure Data Factory code and our pipelines.
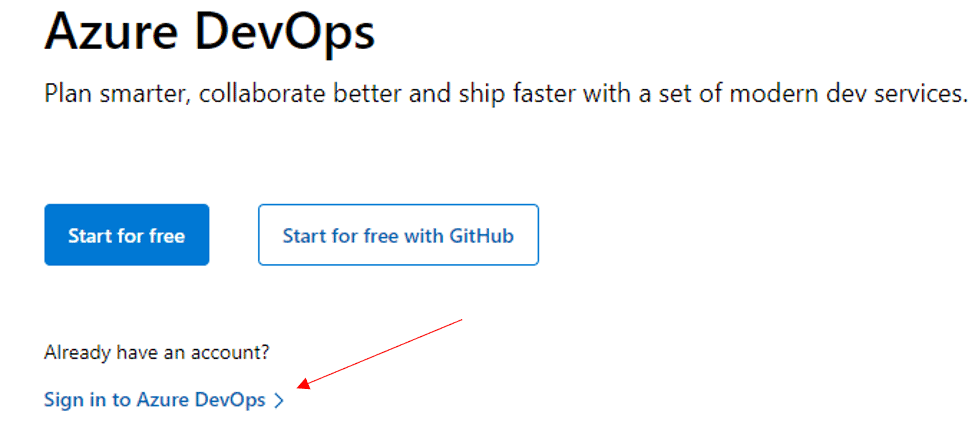
Go to the Azure DevOps website and click on “Sign in to Azure DevOps” below the blue “Start for free” button.
Use the same credentials that were used to sign in to Azure.
You will be taken to a page confirming the directory. DO NOT CLICK CONTINUE. Follow the steps below based on the type of account you are currently using.
2.1.1 Personal Account
If you are using a personal account for both Azure and DevOps you will need to change your directory when logging in. This will allow you to connect Azure Services to DevOps and vice versa.
Once logged in, you will see the following screen:
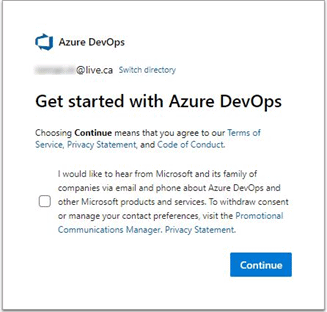
Click on “Switch Directory” next to your e-mail address and make sure “Default Directory” is selected. The directory name might be different if you have made changes to your Azure Active Directory.
Click “Continue”.
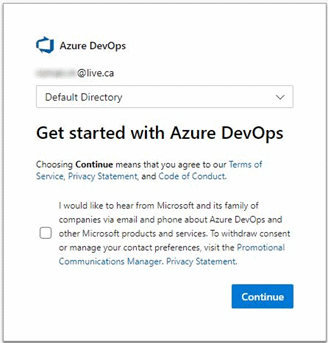
2.1.2 Organizational Account
If you are using an Organizational account you will already be associated with a directory.
Click “Continue”
2.2 Creating Your Project
Currently, you should be on the “Create a project to get started” screen, you will also notice the organization name that was automatically created for you in the top left-hand corner.
Before we create our project, let’s first check and see that the DevOps organization is indeed connected to the correct Azure Active Directory.
At the bottom-left of the “Create a project to get started” click on “Organization Settings”
In the left pane select “Azure Active Directory” and make sure that this is the same tenant that was used when your Azure Services were created.
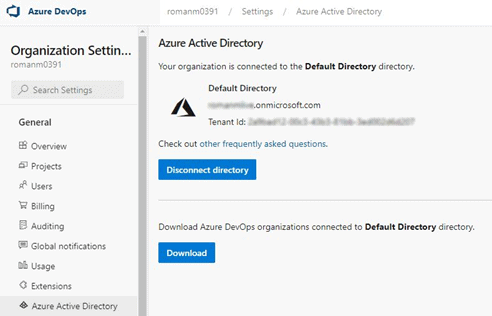
Keep in mind your Directory name might be different compared to what is shown in the screenshot.
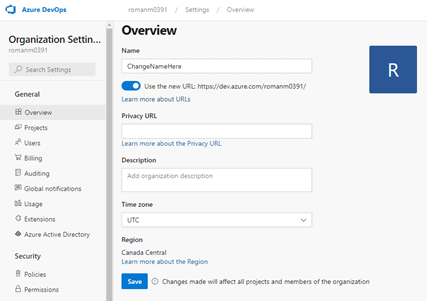
This is not required but now is the best time to change the organization name within DevOps as doing so, later on, could cause issues.
While staying on the “Organization Settings” page, click on “Overview” in the left pane.
Change the name of the organization and click “Save”.
Go ahead and click on the Azure DevOps button in the top left-hand corner.
We can now start creating our project within DevOps. Our project will be named “Azure Data Factory”
Leave the visibility as “Private” and select Git for “Version control” and Basic for “Work item process” and click on “Create project”
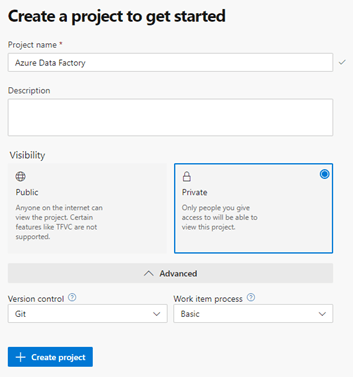
Microsoft has documentation that goes over the different types of version controls and work item processes.
Click on “Create project”
We have now created an organization in DevOps as well as a project that will contain our repository for Azure Data Factory. You should be loaded into your project welcome page after creating it.
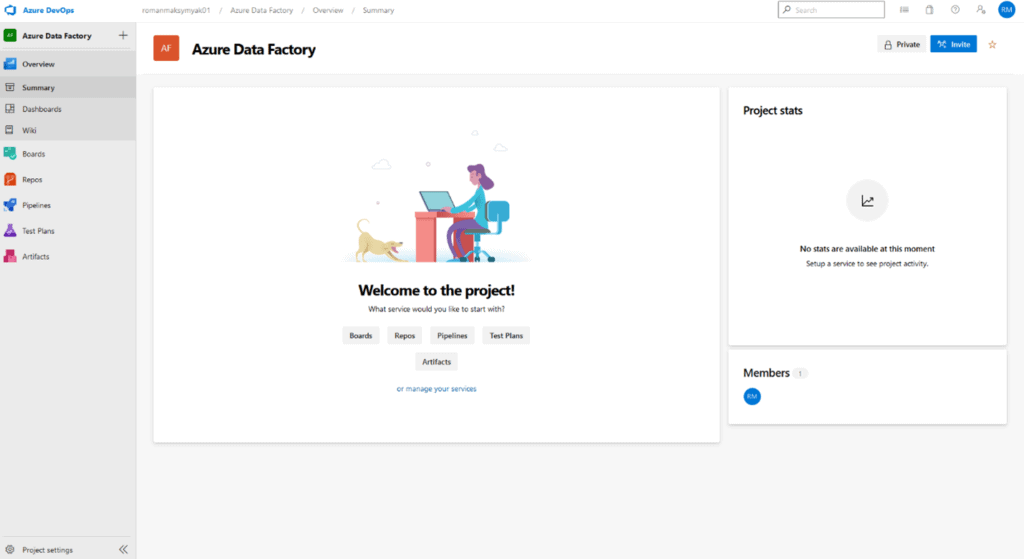
If this is your first time using Azure DevOps, take the next few minutes to explore the options within the project. Our focus will be on the “Repos” and “Pipelines” services visible in the left menu.
2.3 Link Dev Data Factory to DevOps Repo
Our next step is to connect our DEV Data Factory to the repository we have just created. This will be the only Data Factory that will be added to the repository. It will be the DevOps release pipeline’s duty to push that code into UAT and PROD.
In the Azure portal go to your DEV Resource Group and click on your DEV Data Factory, then click “Author & Monitor”.
On the DEV Data Factory home page, click on “Set up code repository”
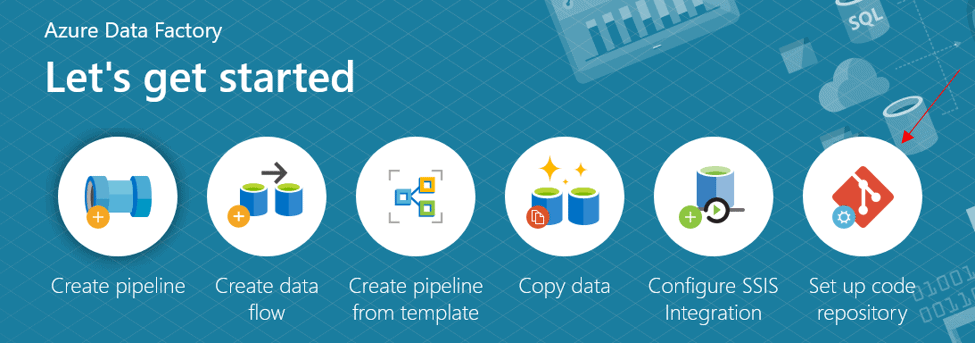
There will be several options for getting the DEV Data Factory connected to the repository.
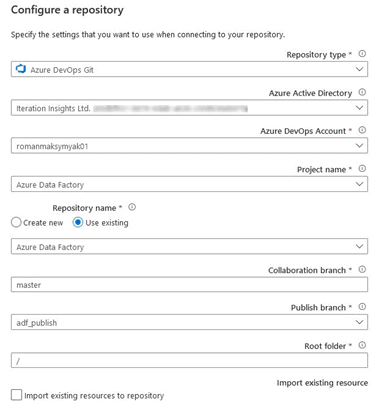
Once the “Configure a repository” pane opens, select the appropriate values in the settings:
- Repository Type – Azure DevOps Git
- Azure Active Directory – Select your Azure Active Directory from the list
- Azure DevOps Account – Select the organization name that was created during the “Creating an Azure DevOps organization and repo” step.
- Project Name – Azure Data Factory
- Repository name – Select “Use existing”, from the drop-down select Azure Data Factory
- Collaboration branch – master
- Publish branch – adf_publish
- Root folder – Leave it as the default “/”
- Import existing resource – Since this Data Factory is new and contains nothing in it, we will not be selecting “Import existing resources to repository”
Your values for certain fields will be different, but this is what you should expect:
Click “Apply”.
Now, let us check to make sure that our Data Factory is indeed connected to our repository.
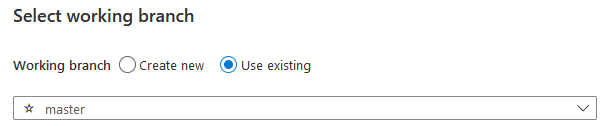
On the left-hand side click on the pencil “Author”. If you get prompted to Select working branch, make sure you have “Use Existing” and “master” selected and click Save at the bottom.
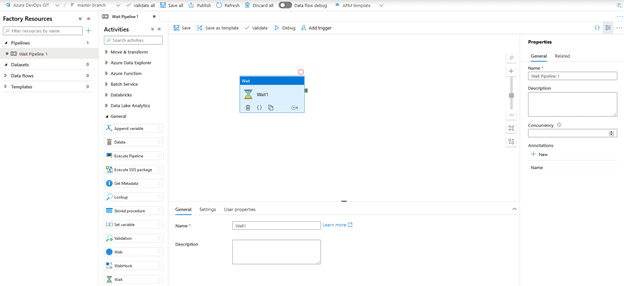
Under “Factory Resources” click on the + sign and select “New Pipeline”. Name it “Wait Pipeline 1” and insert a “Wait” activity into the pipeline canvas. Since a wait activity does not require any inputs or outputs, we can successfully continue without any validation issues.
At the top of the screen click on “Save all” and then “Publish”. When the Pending changes pane comes up, click “OK”
Go to the Azure Data Factory project in DevOps and select “Repos”. You will see that our recently created pipeline is now there.

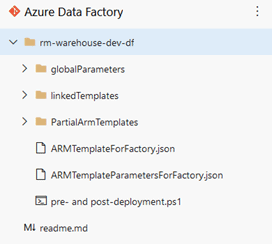
Now is a good time to go over the two branches that are currently present in our repository. The master branch was created when we created the repository will contain each asset of our Data Factory, such as datasets, integrationRuntimes, linkedServices, pipelines, and triggers. Each item will have a .json file with the properties.
So, where did adf_publish come from? Well, it got created automatically when we first published our “Wait Pipeline 1”. This branch will contain two extremely important files that will allow us to pass on what we develop in the DEV Data Factory to UAT and PROD.
ARMTemplateForFactory.json will contain all the assets within our Data Factory and all their properties.
ARMTemplateParametersForFactory.json will contain all the parameters used in any of the assets within our DEV Data Factory.
Now that our resources are created and connected, we can go ahead and create our Pipeline. Our pipeline will essentially grab the contents in their current state from the adf_publish branch and make it available for further releases into UAT and PROD.
Step 3: Creating an Azure DevOps Pipeline
The main responsibility of our pipeline will be to grab the contents of the adf_publish branch. This branch will contain the most recent version of our DEV Data Factory which we can later use to deploy to our UAT and PROD Data Factories.
3.1 Pre- and post-deployment PowerShell Script
There is an extremely important “pre-and post-deployment” PowerShell script that needs to be run during each release. Without this script, if you were to delete a pipeline in your DEV Data Factory and deploy the current state of DEV into UAT and PROD, that deletion would NOT happen in UAT and PROD.
You can find this script in the Azure Data Factory documentation at the bottom of the page. Copy it over to your favorite code editor and save it as a PowerShell file. I called mine “pre-and post-deployment”.
Go to Azure DevOps and click on “Repos” on the left-hand side. Make sure you are in the adf_publish branch and click on ellipses while hovering over your dev Data Factory folder.
Click “Upload file(s)” and upload the file from the location where it was saved and click “Commit”.

You should now see the “pre-and post-deployment.ps1” script in the adf_publish branch.
3.2 Creating the Azure Pipeline for CI/CD
Within the DevOps page on the left-hand side, click on “Pipelines” and select “Create Pipeline”
On the next page select “Use the classic editor”. We will use the classic editor as it allows us to visually see the steps that take place. Once everything is completed you can have a look at the YAML code that was generated.

We will be connecting this pipeline to the adf_publish branch as it will contain the ARMTemplateForFactory and ARMTemplateParametersForFactory .json files.
On the “Select a source” pane, make sure you have the following selected:
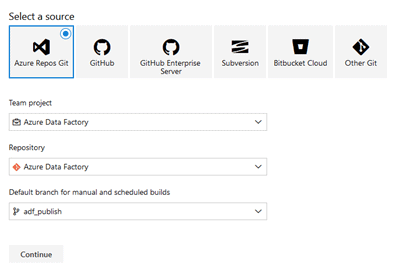
Click “Continue”
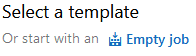
At the top of “Select a template” click on “Empty job”
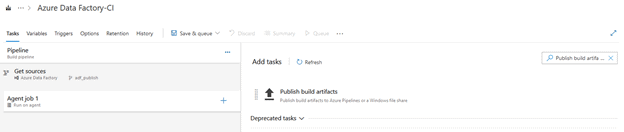
The following task will grab the contents of the DEV Data Factory folder under the adf_publish branch that is in Repos > Files.
To the right of “Agent job 1” click on the + sign and search for “Publish build artifacts” and click “Add”
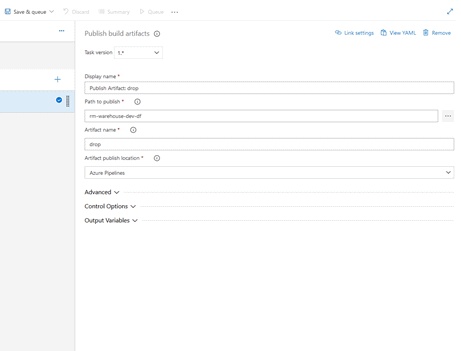
Once you click on the “Publish Artifact: drop” task underneath Agent job 1, you will see additional settings in the pane on the right.
We will only be changing the “Path to Publish”.
Click on the ellipsis button to the right of “Path to Publish” and select the <Initial>-warehouse-dev-df folder:
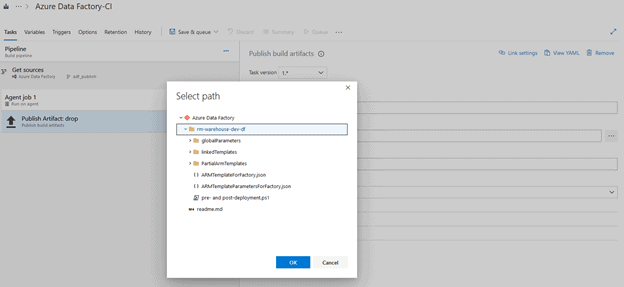
Click “OK”
Your task properties should look like this:
On the top of the pipeline, click on the “Triggers” ribbon. Make sure you have “Enable continuous integration” checked-off and adf_publish set under “Branch specification”
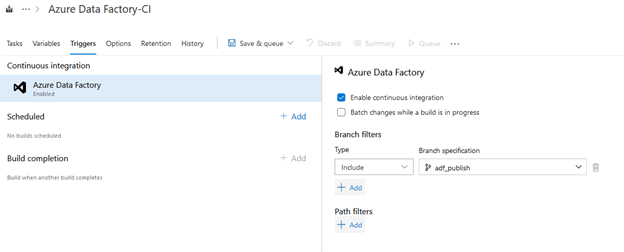
With this setting enabled, anytime a user publishes new assets in the dev Data Factory this pipeline will run and grab the most recent state of that Data Factory.
Click “Save & queue” at the top and then “Save and run”
You can click on the “Agent job 1” to get a more in-depth look into what is going on in the background.
The job should have completed successfully.
On the left-hand side, click on “Pipelines”
You will be able to see the pipeline that we created as well as the state of it. You will also notice that the most recent change to adf_publish was when we added the PowerShell script.
Step 4: Creating a DevOps Release Pipeline for Continuous Integration And Deployment
The release pipeline will utilize the output of the pipeline we created above, and it will pass on the contents of that pipeline to our UAT and PROD Data Factories. Keep in mind, we have only created the Wait Pipeline in the dev Data Factory.
4.1 Creating the Release Pipeline
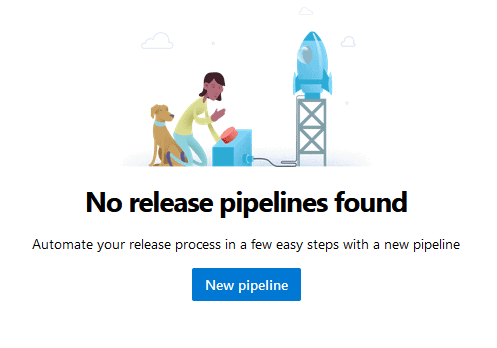
On the DevOps page, click on “Pipelines” and then on “Releases”
Click on “New pipeline”
When the “Select a template” pane comes up, click on “Empty job”
Rename the “Stage name” to “UAT”
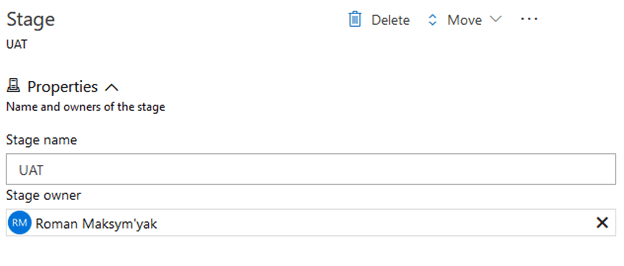
Click “Save” In the top right-hand corner. Select “OK” when the Save pop-up shows up.
4.2 Adding the Artifact
Now that we have the UAT stage created, we will now add the artifact which is the pipeline we created earlier. This pipeline will contain the necessary configurations that will be pass through to each stage.
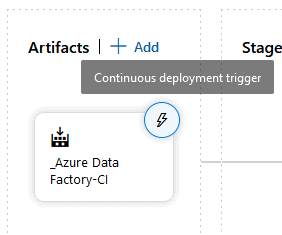
Within the release pipeline, click on “Add an artifact”
In the “Add an artifact” pane, make sure the following are selected:
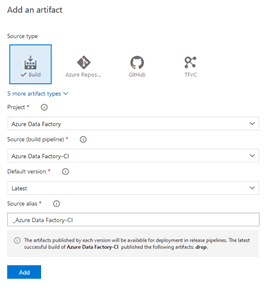
Click “Add”
Our Release Pipeline should look like this:
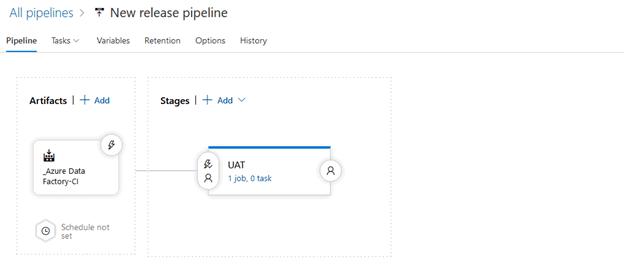
4.3 Building the Release Pipeline UAT Stage
Now we can start adding tasks to our UAT stage within our “New release pipeline”.
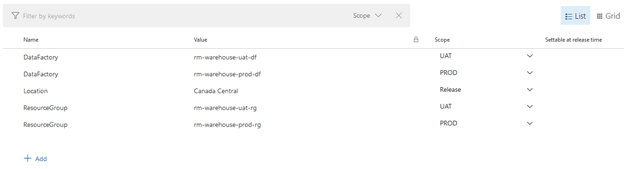
At the top of our Release Pipeline click on “Variables”. We will be adding a ResourceGroup, DataFactory and Location variable so that they can be passed through automatically to different tasks.
Click on he “Add” button and create the following pipeline variables:
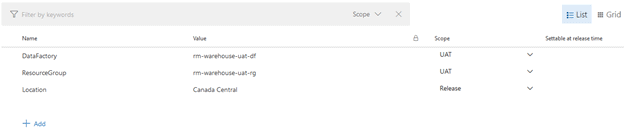
*Important* Make sure your location variable contains the same location as your Resource Groups and Data Factories.
Note that those variables are currently scoped for the UAT stage and will not work in any other stage.
Make sure to save the changes and go to the pipeline view.
Click “1 job, 0 task” on the UAT box, then click on the + to the right of “Agent job”.
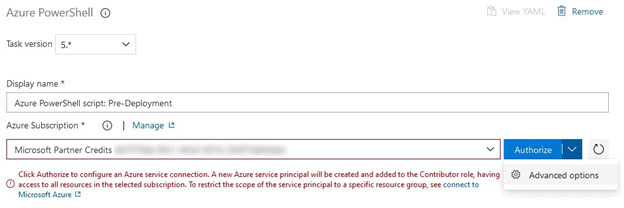
Search for “Azure PowerShell” and add it from the list.

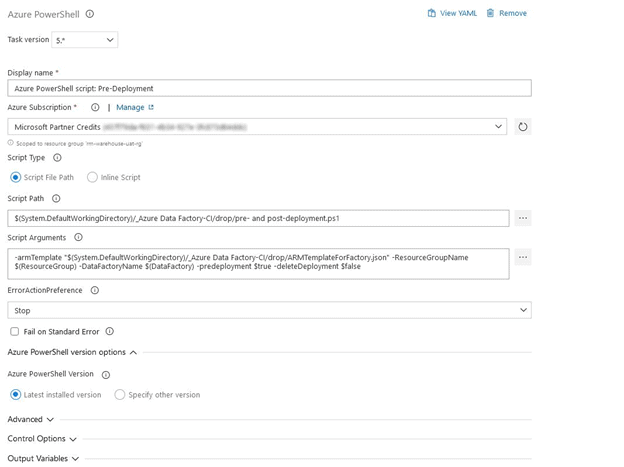
We will give this task a display name of “Azure PowerShell script: Pre-Deployment”.
When it comes to selecting the Azure Subscription, we will create a Service Principal within the UAT Resource Group. This Service Principal will be added to the PROD Resource Group later.
From the Azure Subscription drop-down list, select your subscription. We want to limit what this service principal has access to, so instead of just clicking Authorize, click on the down arrow, and select “Advanced options”.
In the pop-up window, we should already be in the “Service Principal Authentication” tab.
Make sure that the “Resource Group” option has the UAT Resource Group Selected. We can leave all the other options as they are.
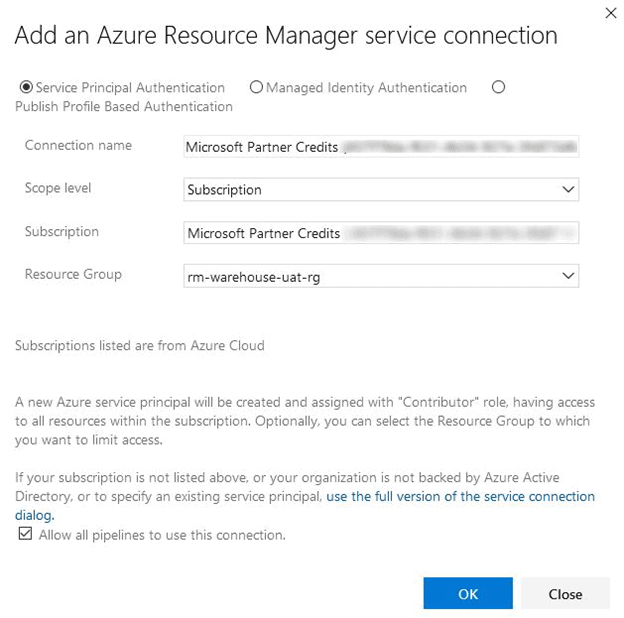
Click “OK”
Keep the “Script Type” as “Script File path”.
Click on the ellipsis to the right of “Script Path” and select the PowerShell script we uploaded earlier. It will be in the Artifact drop.
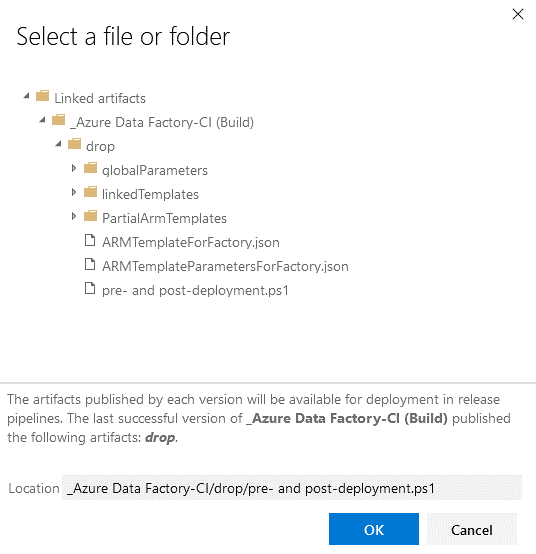
Click “OK”
We will be using the “Script Arguments” provided in the Azure Data Factory documentation. For Pre-Deployment, we will use the following arguments:
-armTemplate "$(System.DefaultWorkingDirectory)/<your-arm-template-location>"
-ResourceGroupName <your-resource-group-name> -DataFactoryName <your-data-factory-name> -predeployment $true -deleteDeployment $false
There are several adjustments we must make to this:
- Arm template location which will be located within the artifact drop
- Resource Group Name for our UAT environment
- Data Factory Name within our UAT Resource Group
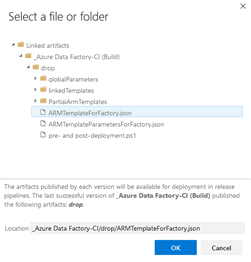
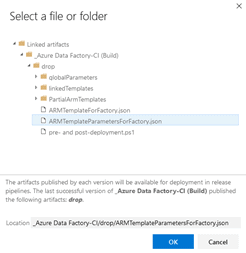
The easiest way to find the location of your arm template is to click on the ellipsis to the right of “Script Path”. Select “ARMTemplateForFactory.json” and copy the location portion of that window. Click on “Cancel” as we do not want to select the template.

Replace <your-arm-template-location> with the location that we copied.
For the Resource Group and Data Factory, we will utilize the variables that we created earlier.
Replace <your-resource-group-name> with $(ResourceGroup) and <your-data-factory-name> with $(DataFactory)
The arguments should look like this:
-armTemplate "$(System.DefaultWorkingDirectory)/_Azure Data Factory-CI/drop/ARMTemplateForFactory.json" -ResourceGroupName $(ResourceGroup)
-DataFactoryName $(DataFactory) -predeployment $true -deleteDeployment $false
Select “Latest installed version” for the “Azure PowerShell Version”
Click “Save”
Let us add another task. Click on the + button and search for “ARM Template” and add “ARM template deployment” from the list.

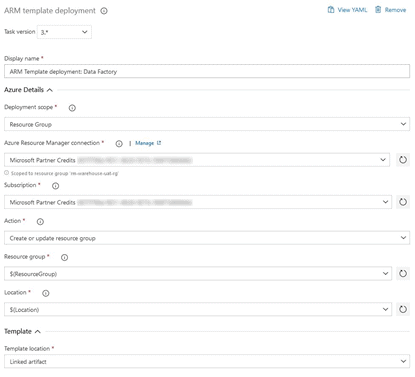
Change the “Display Name” to “ARM Template deployment: Data Factory”
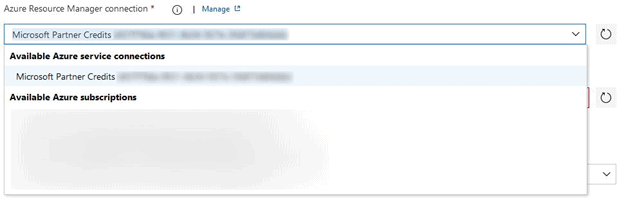
Select the Service Principle that we created earlier under “Azure Resource Manager connection”
Adjust the rest of the options as follows:
- Subscription – Select your subscription
- Action – Create or update resource group
- Resource group – We will use the $(ResourceGroup) variable we created. Manually type in “$(ResourceGroup)”. This will recall the correct value when the pipeline runs.
- Location – Manually type in “$(Location)”
- Template location – Linked Artifact
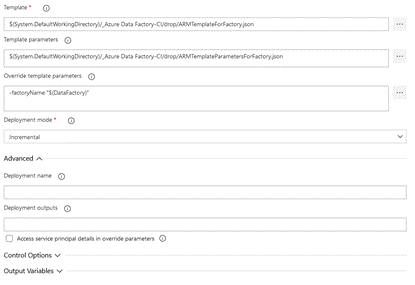
- Template – Using the ellipsis, select the ARMTemplateForFactory.json
- Template parameters – Using the ellipsis, select the ARMTemplateParametersForFactory.json
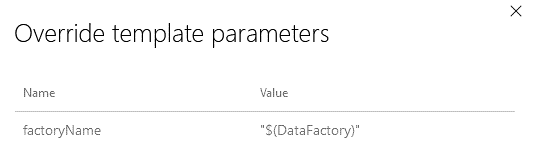
- Override template parameters – Click on the ellipsis and change the “factoryName” parameter to “$(DataFactory)”
- Deployment mode – Make sure this is set to Incremental, as complete will delete any resources that are not present in our arm template.
The ARM template task should look something like this:
Click “Save”
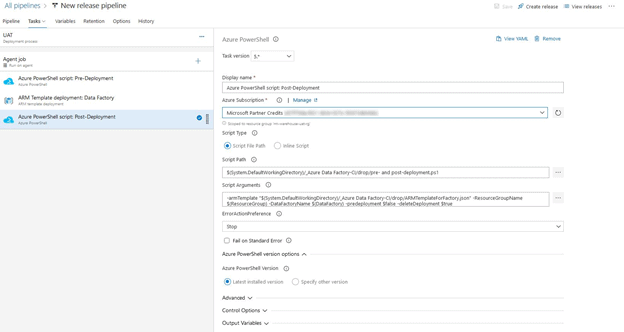
Let us add another Azure PowerShell task and call it “Azure PowerShell script: Post-Deployment”
The only thing that will differ when compared to our initial PowerShell task is the Script Arguments. Our Pre-Deployment arguments contained “-predeployment $true” and “-deleteDeployment $false”, but for the Post-Deployment script, we will change that to “-predeployment $false” and “-deleteDeployment $true”
-armTemplate "$(System.DefaultWorkingDirectory)/_Azure Data Factory-CI/drop/ARMTemplateForFactory.json" -ResourceGroupName $(ResourceGroup)
-DataFactoryName $(DataFactory) -predeployment $false -deleteDeployment $true
The UAT Stage should now look like this:
Click “Save”
4.4 Adding our Service Principal to the PROD Resource Group
Now that are UAT stage is complete, let us create the PROD stage. During the development of the UAT stage, we created a service principal with access to our UAT Resource Group so that DevOps could make the intended changes to our UAT Data Factory. We now must give this service principal the same permissions in our PROD Resource Group before we begin creating the PROD stage within our Release Pipeline.
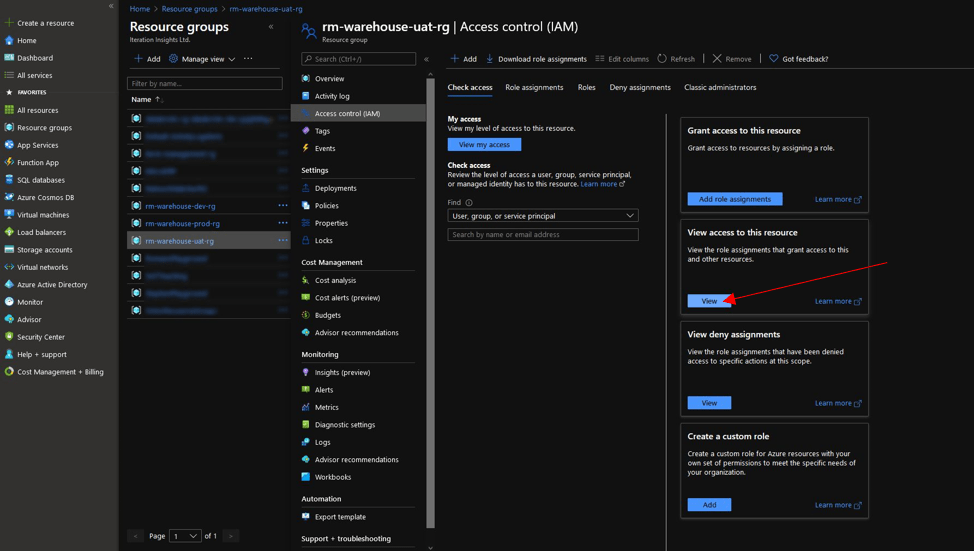
Go to your Azure portal and navigate to your UAT Resource Group and select on “Access Control (IAM)”
Click on “View” under “View access to this resource”
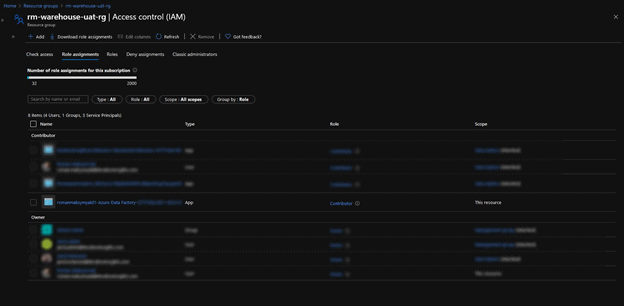
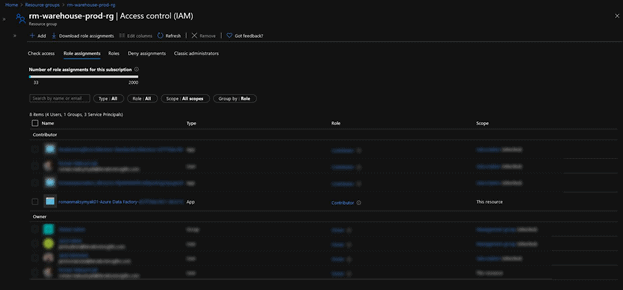
You will notice that there is an entity under the Contributor role that contains the name of your DevOps organization as well as the project name. Copy as much of the name as you can:
Now go to your PROD Resource Group and navigate to “Access Control (IAM)”
Click on “View” under “View access to this resource”
You will see that that service principal is not present.
At the top of the window, click on the “+ Add” button and select “Add role assignment”
Select the Contributor role from the drop-down and leave the “Assign Access to” as “User, Group, or service principal”
Paste the recently copied service principal name into the “Select” search bar and select the service principal.
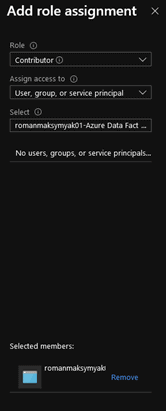
Click “Save”
You should now see the service principal in your PROD Resource Group:
Now that we have completed this step. We can go back to DevOps and complete the PROD stage within our Release Pipeline.
4.5 Building the Release Pipeline PROD Stage
Navigate back to our “New release pipeline” and hover over the UAT stage. Once visible, click on “clone”
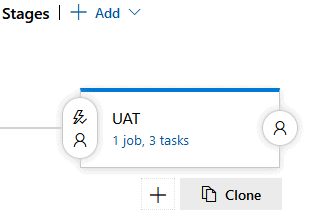
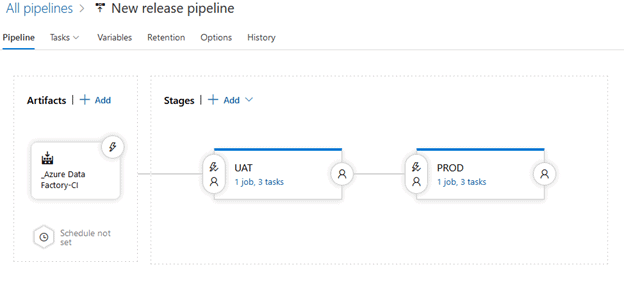
Rename “Copy of UAT” to “PROD”. Your Release Pipeline should look like this:
Since we created UAT with the use of variables, we can easily have the PROD stage function correctly without a lot of effort.
Let us have a look at the pipeline variables.
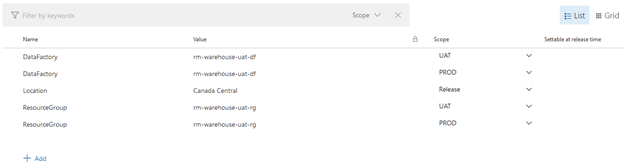
We can see that the ResourceGroup and DataFactory variables were duplicated but are under the PROD scope. We must change the actual values to reflect our PROD resources as follows:
Click “Save”
We initially set up our Azure Data Factory-CI pipeline to run whenever there was a change in adf_publish.
We can now adjust how the Release Pipeline runs. I want a new release to occur every time the Azure Data Factory-CI pipeline changes, essentially whenever there is a change in adf_publish. Afterwards, I will want that change to automatically apply to our UAT Data Factory. When it comes to the PROD Data Factory, I will require a Pre-Deployment approval, before the changes in DEV and UAT are present in PROD.
Within our “New release pipeline” click on the “Continuous deployment trigger” button
Enable “Continuous deployment trigger”

Next, we will adjust the pre-deployment conditions of the UAT stage to automatically run.
Click on the “Pre-deployment conditions” button on the UAT stage.
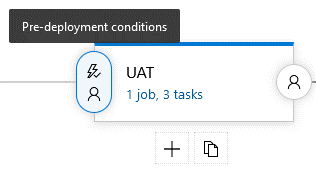
Make sure the “After release” option is selected
Click on the “Pre-deployment” conditions for the PROD stage and set the trigger to be “After stage”, with the stage being set to UAT
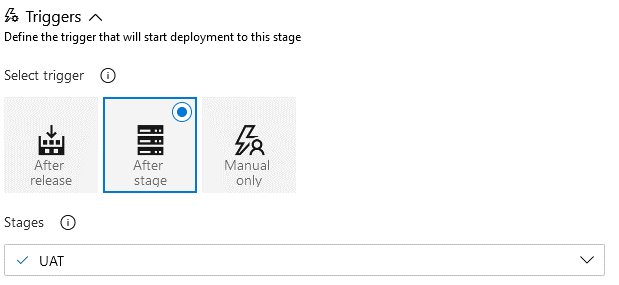
We will also enable “Pre-deployment approvals”. Enter your e-mail address as we will be the ones approving this trigger.
Click “Save”
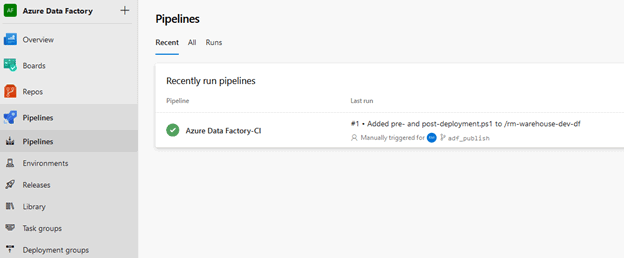
Now that we have completed the crucial parts of our Release Pipeline, we can now test it. We will manually initiate the Azure Data Factory-CI pipeline which will trigger our Release Pipeline.
Keep in mind, we only have the “Wait Pipeline 1” in our DEV Data Factory. Our UAT and PROD Data Factories are currently empty.
On the left-hand side, go to Pipelines and select the Azure Data Factory-CI.
Click on “Run pipeline” in the top left-hand corner. Click “Run” once more.
On the left-hand side of the screen, navigate to “Releases”. You should now be able to see our first release. We can also tell that the UAT stage of the Release Pipeline is currently running.
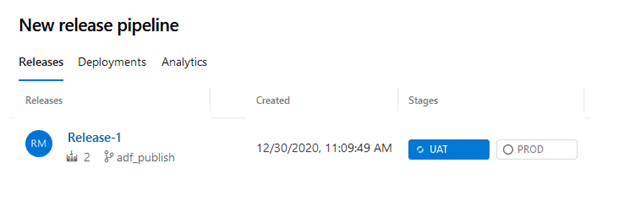
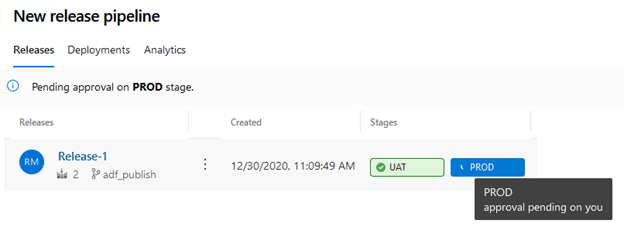
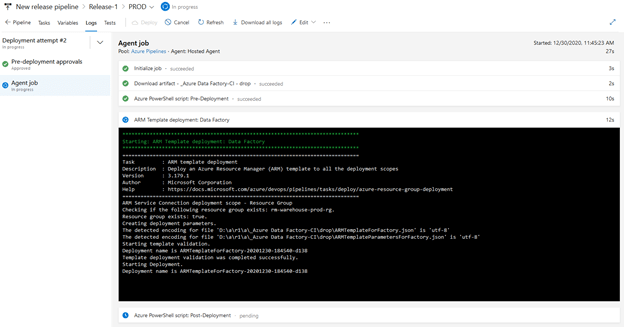
Our Release Pipeline run should now show us that the UAT stage completed successfully and the PROD stage is ready for approval.
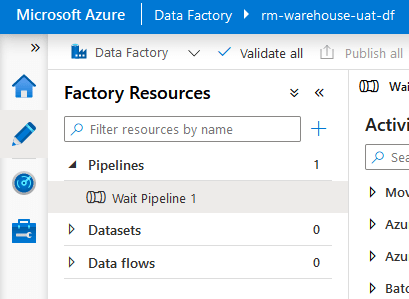
Go to your UAT Data Factory and see if the “Wait Pipeline 1” is present. If everything ran correctly, you will be able to see it.
Now we can go approve the PROD stage and have the “Wait Pipeline 1” deploy to our PROD Data Factory.
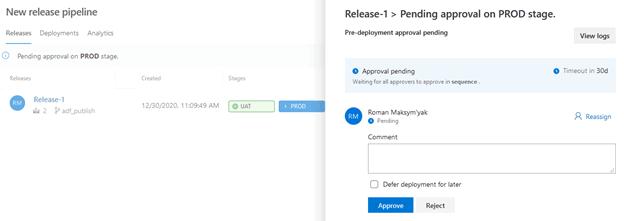
Navigate to our “New release pipeline” and click on the PROD stage. Once the approval pane comes up, click on “Approve”
We can now see that the PROD stage is in progress.

Feel free to click on the PROD stage as you will see all the tasks and their progression:
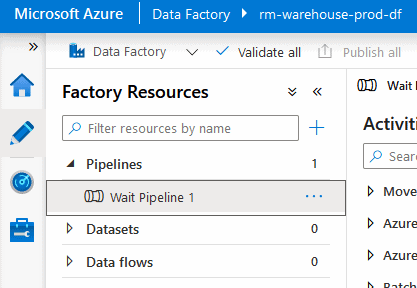
Upon checking our PROD Data Factory, we can see that the “Wait Pipeline 1” is present.
4.6 Running the Release Pipeline
Now, we will go make some changes in our DEV Data Factory and see how the entire process works from start to finish.
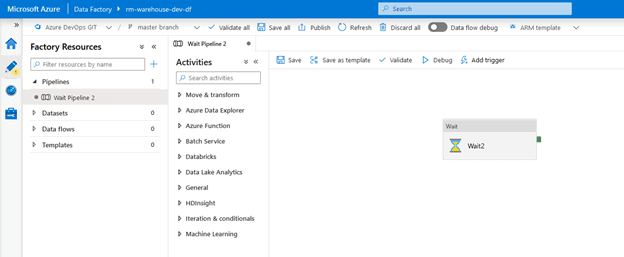
Navigate to your DEV Data Factory and do the following:
- Create a pipeline called “Wait Pipeline 2”
- Insert a Wait activity called “Wait 2”
- Delete the “Wait Pipeline 1” pipeline
The result should look like this:
Click “Save all” and “publish” all the changes.
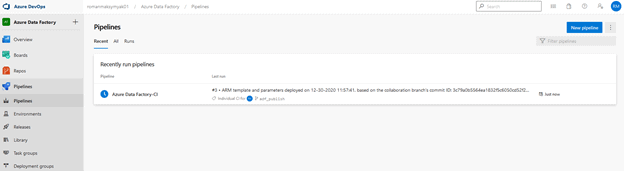
When we navigate to “Pipelines” in DevOps, we can see that the Azure Data Factory-CI pipeline has already been triggered, because the adf_publish has just changed.
You will also notice that in “Releases”, Release-2 has been created and the UAT stage is currently deploying.
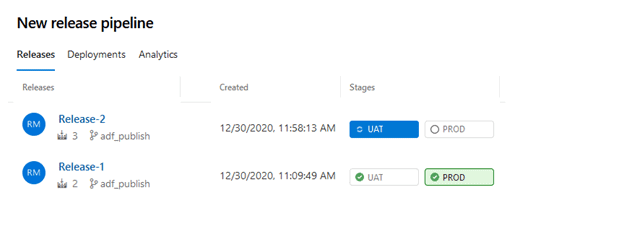
With the following image we can tell that our UAT Data Factory is on Release-2 as the stage has a green background. Our PROD Data Factory is currently on Release-1
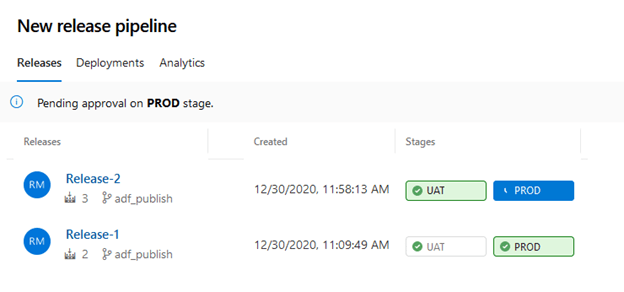
Approve the PROD Stage and let us check the state of the UAT and PROD Data Factories.
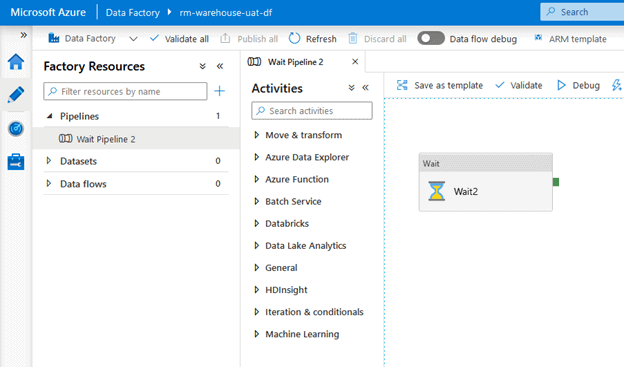
Your UAT Data Factory should have the same changes that we had made in DEV:
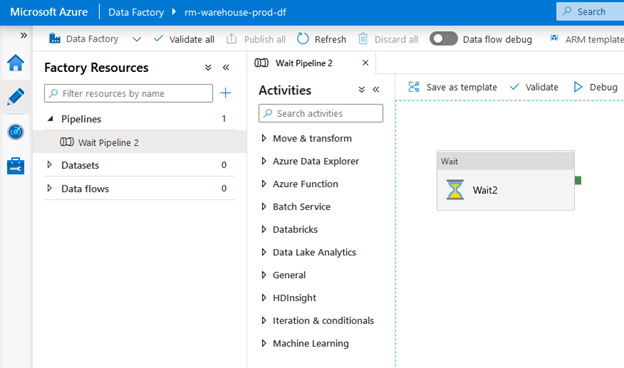
Your PROD Data Factory should have the same changes that we had made in DEV:
We have now confirmed that all our resources are connected properly, and our Pipeline and Release Pipeline runs correctly. Any future development in the DEV Data Factory can be replicated in UAT and PROD. You will be able to avoid having small differences between your environments and save time troubleshooting issues that should not have been there in the first place.
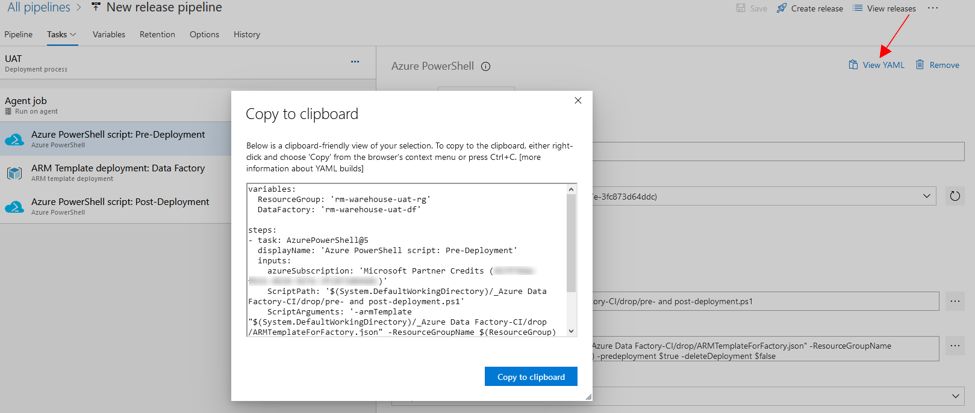
I highly recommend going through each task we created and viewing the YAML code that was generated. This will give you a good idea as to how it should be structured and what it should contain.