Time Intelligence Functions in Data Analysis Expressions(DAX) allows users to analyze and manage data using time intervals, such as days, months, quarters, and years.
It also takes advantage of the opportunity to create and compare calculations throughout those intervals. For time intelligence functions to work effectively in Power BI, an important requirement must be met, which is to have a Date Table in your model.
In this blog, we will be discussing what a Date Table is in Power BI and highlighting different ways you can create one.
Sections
- Introduction
- What Is a Data Table?
- Why Is a Data Table Important?
- Ways to Generate a Date Table
- Conclusion
- References
What Is a Date Table
A date table in Power BI is a specialized table that consists of a list of dates and possibly other time-related information. It is used to support the creation of date-based measures, as well as to enable the use of time-based filters in reports and dashboards. Having a table of dates can be useful because it allows you to easily compare data across different time periods and manipulate date-based measures.
You can create a date table by using the built-in “Date” function or by importing a list of dates from an external source. Once created, you can then link the date table to other tables in your data model using the date field as a common key.
Why Is a Date Table Important
A Date Table is important in Power BI because it makes it simple to organize and analyze data by date. You can use it to filter your data or create visuals with dynamic time periods, such as the current month or quarter. A date table can also be used to compare data over time, such as from one month to the next or from one year to the next.
When working with large data sets, having a separate date table makes it easier to establish associations between your data tables and the date table, which can help you optimize your data model and boost productivity.
Ways to Generate a Date Table
There are diverse ways to create or add a date table to your model. We will be looking at a few of them. They include:
- Auto date/time option
- Connecting to existing date table with Power Query
- Create with Dax
Auto Date / Time Option
This option is one of the simple and easy ways to create a date table. It is achieved by enabling the time intelligence option in Power BI that makes use of a date column already existing in your model. This option is viable when performing data exploration or profiling. However, it is important to note that this option does not give room for the provision of a standalone date table that can propagate filters or be used to filter other tables.
To enable the Time Intelligence in Power BI, Follow the steps below:
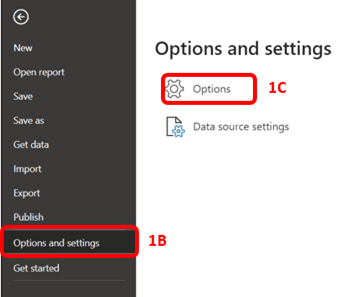
- Click on the File ribbon, then select Options and settings > Then click on Options and a dialogue box will appear.
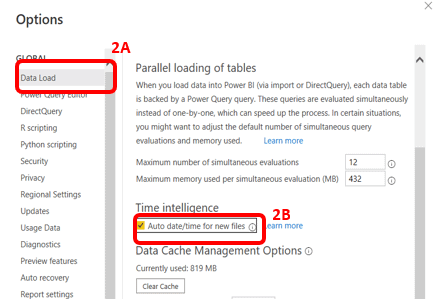
- Under Options select Data Load under Global and tick the Time Intelligence Box.

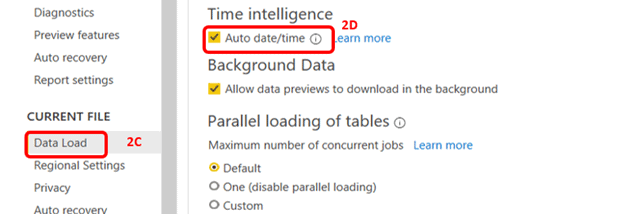
Under Current File> select Data Load and tick the Time Intelligence Box
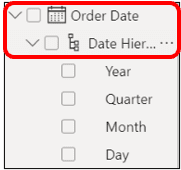
Once these options are enabled, a hidden auto date/time table is created based on the dates in columns within the tables in the model. You will know this is a date table by the date icon and a drop-down button when expanded will house the date hierarchy as shown in the picture.
Connecting to Existing Date Table With Power Query
If you are working with data from a data warehouse, you may already have a date dimension table that you can use as a date table in Power BI. If that is the case connect to it with Power Query and use it. This way, your model takes advantage of a single source of truth for date/time on your team.
Create with DAX
CALENDAR and CALENDARAUTO are two DAX functions that can be used to make a basic date table from scratch. Both methods return a table with a single “Date” column and a list of date values. While CALENDAR looks among all the dates in the data model and automatically identifies the beginning and final year mentioned inside the model, CALENDARAUTO does not require the limits of the set of dates.
1. To make use of CALENDAR and CALENDARAUTO functions, Navigate to the Home ribbon, click on New table, and type in the DAX function as shown in the picture below. In the Dax formula, you will notice ‘Fact Activities’[Date]. That is a column in a table in the model on which I want to base my Date table. You can always choose a specific range of date as shown in the second example.


2. There after you can go ahead to create other columns like Year, Month, Month Number, Weekday, Week Number etc.

After the date table is created, it is important to mark it as a date table as shown below
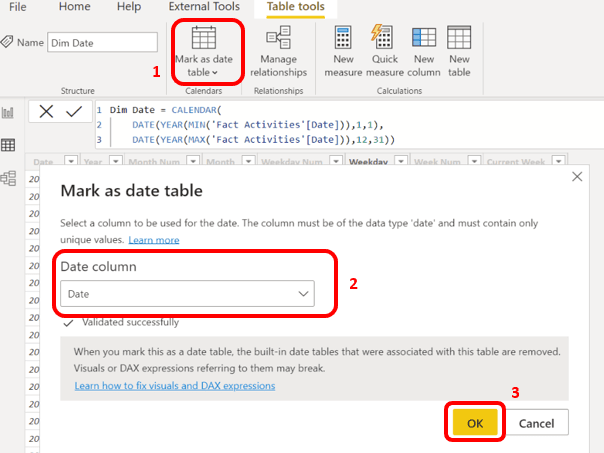
3. For CALENDARAUTO make use of the function to create a date table. The downside of using this function is that it creates a date table consisting of so many irrelevant dates and you will have to remove the dates that do not fall into the period of interest.

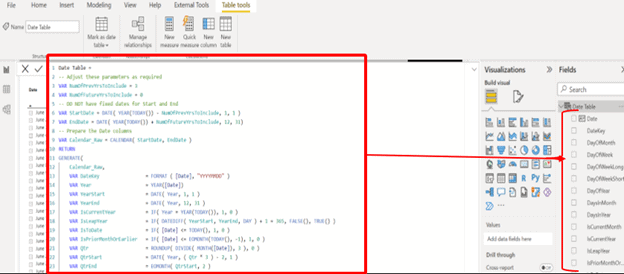
Alternatively, and our recommendation, you can develop a detailed, robust, and scalable date script/template, which can be pasted when creating a date table and generates all the columns required. Afterward, the table will be marked as a date table using the steps mentioned above.
Conclusion
We have discussed what a date table is and why it is important. We also went through some ways to generate a comprehensive date table in Power BI.
The way you chose to create a date table is entirely dependent on what the goal is. However, because the date table is the most reliable component, you can add it to any of your Data models. We recommend as a best practice for a date table to be regularly specified inside an organization regardless of the method used.
Creating a Power BI Desktop template that contains a properly set date table is advised and should be distributed to all the modelers in your company. This way, anyone can start with a consistently established date table as soon as they create a new model.
References
Don’t miss out on the opportunity to take your Power BI skills to the next level! Click here now to explore our training and events, and learn how to unleash the full potential of this powerful data tool!


